
Outline of 3 bodies

As a student, you determine who gets to have access to your enrollment and financial information. You can set them up to see your financial information (such as your tuition bills) and make payments. You can also give them access to see non-billing information (such as enrollment, schedule, and checklists) or to receive that information from University staff, such as over the phone.  You can give the same person access to both of these types of information, or you can give the access to different people. You follow separate steps to set up each person’s access.

Important: For the safety of your information, if you want someone else to be able to see your information in ConnectCarolina, it’s important to give them their own access instead of sharing your Onyen and password or your PIN with them.

FYI, the person who has access to your tuition bills and other financial information is called an “authorized user”, and the person who has access to see non-billing information such as grades is called a “proxy user.” You’ll see these names in the system, and when the person you give access to receives email notices, that’s what they’ll be called in the notice.

Open the tabs below to see the steps to take to grant someone else access to your information.

This is a Carolina Blue icon of a hand with a dollar sign floating above it.

If someone other than you pays your bills, you need to set him or her up as authorized user so that he or she can access Student Financials – Bill Pay in ConnectCarolina. As a student, you need to enroll in 2-Step Verification (Duo) to see financial (billing) information, but authorized users don’t need to use 2-Step Verification (Duo).

Before you begin these steps, be sure that your pop-up blocker is turned off or disabled and have your phone with you because you’ll need to verify who you are with 2-Step Verification (Duo).

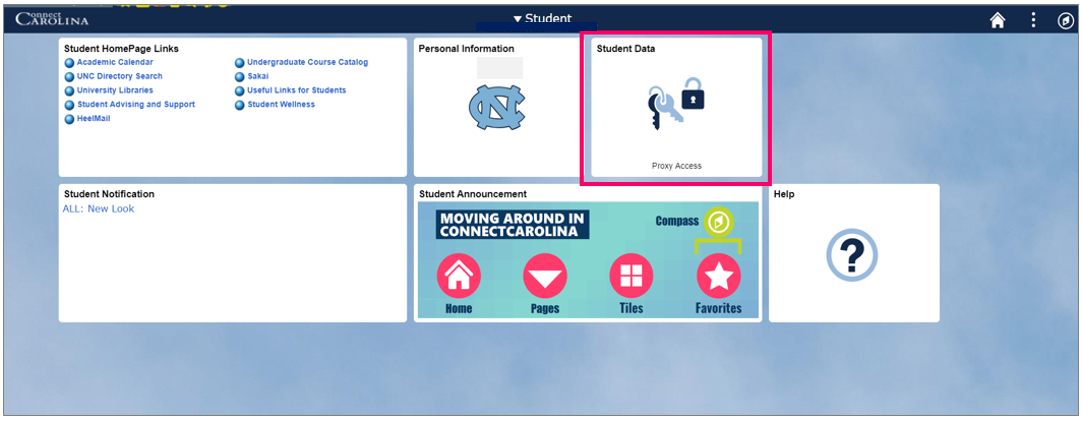
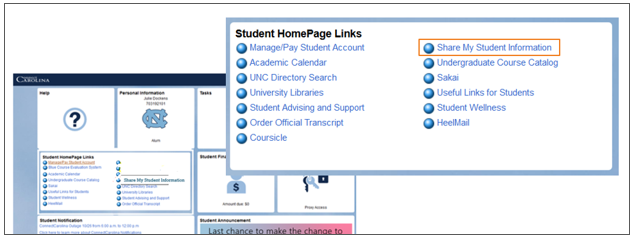
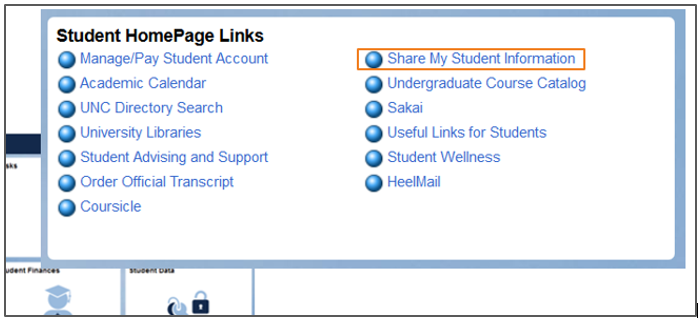
1. Log in to connectcarolina.unc.edu, and from the Student Home page, click the Manage/Pay Student Account link.

screenshot of Manage/Pay Student Account link in Student Homepage links

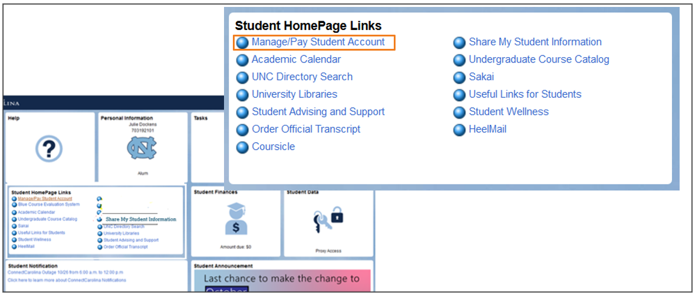
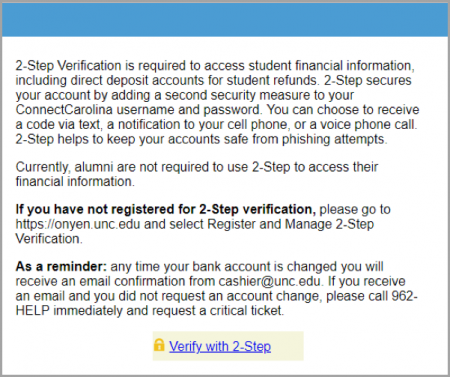
Result:  You will see a screen with information about securing your financial information with 2-Step Verification (Duo) so that the system knows that it’s really you. You’ll need your mobile phone with you before you proceed.

2.  Click the Verify with 2-Step link.

screenshot - verify with 2-Step

3. Choose how you want to verify, whether it is by push, phone call or passcode.

screenshot of 2-Step screen

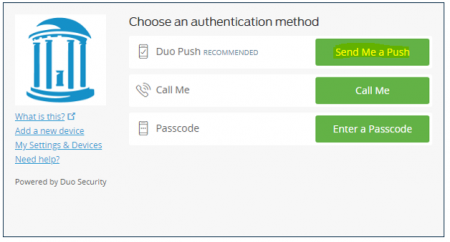
Result: Once you verified your account, you will see the following screen.

Screenshot of Continue to Pay Bills - Manage Student Accounts button.

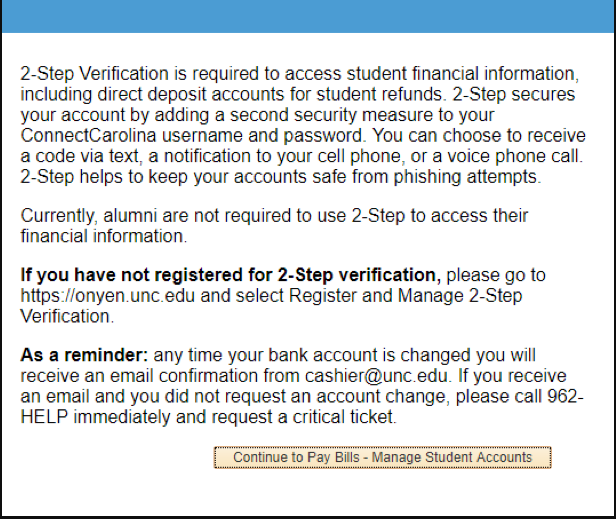
4.  Click the Continue to Pay Bills – Manage Student Accounts button.

Result: The UNC-Chapel Hill Student Account site opens in a new window.

TIP:  If, after clicking the Continue to Pay Bills – Manage Student Accounts button, you don’t move to the next screen, check to make sure that your Pop-Up Blockers are disabled.

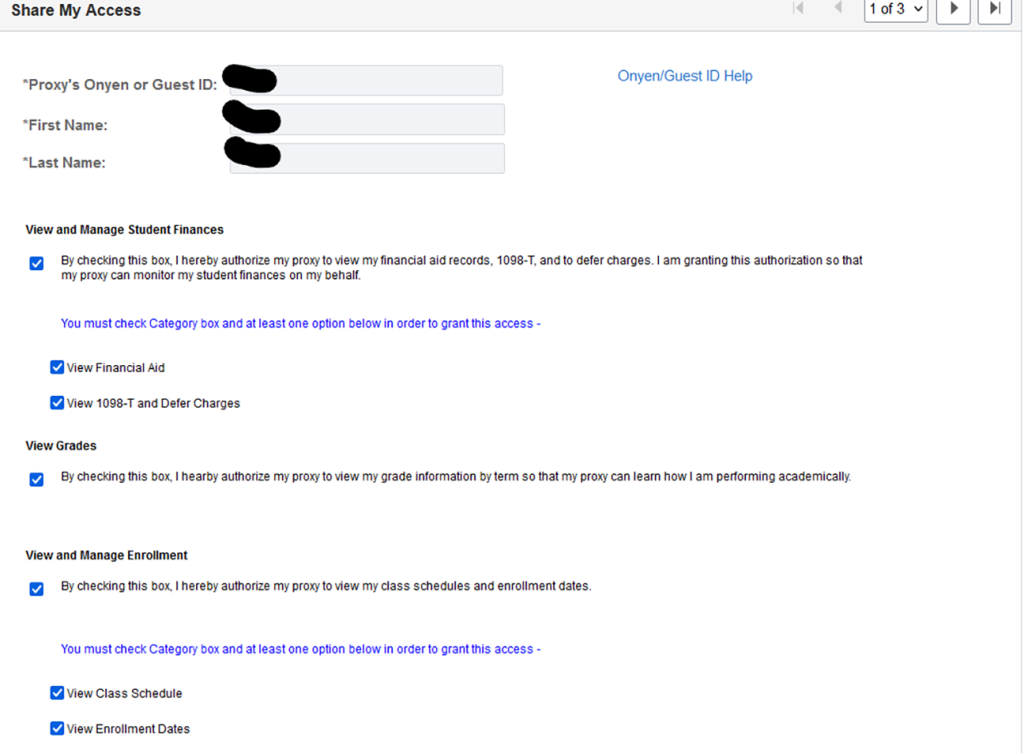
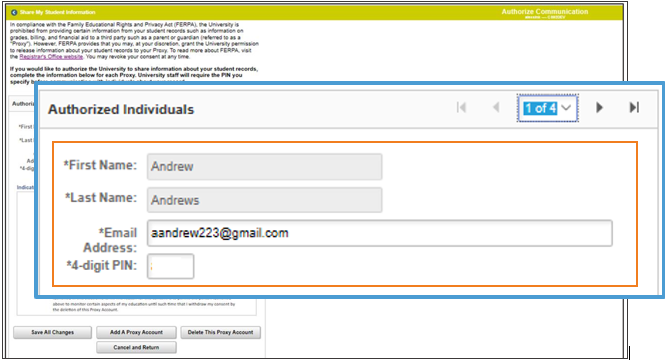
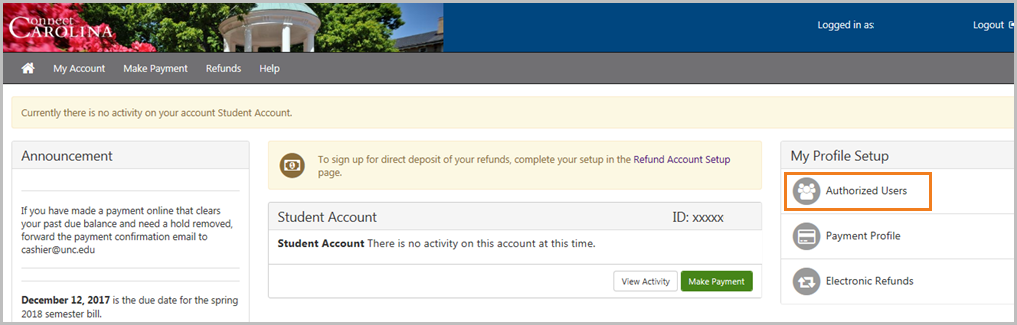
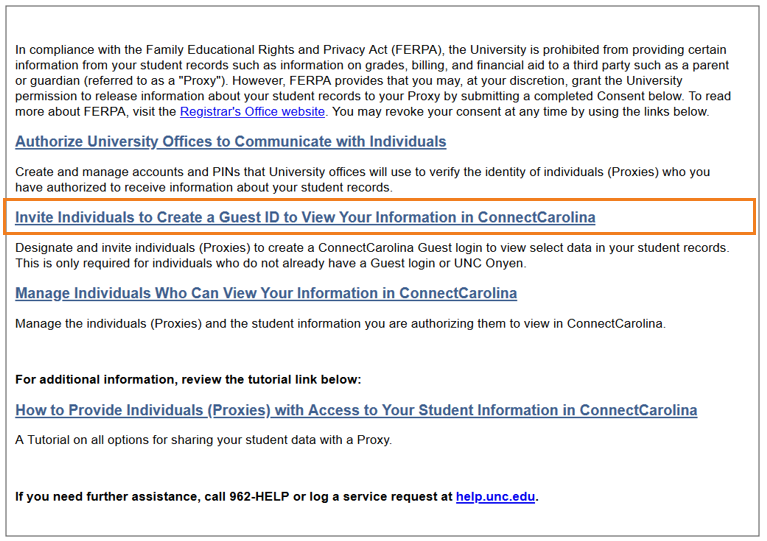
5.    Click the Authorized Users button.  From this page, you can give others (parents, employers, etc.) the ability to access your account information.

Screenshot of Authorized Users button

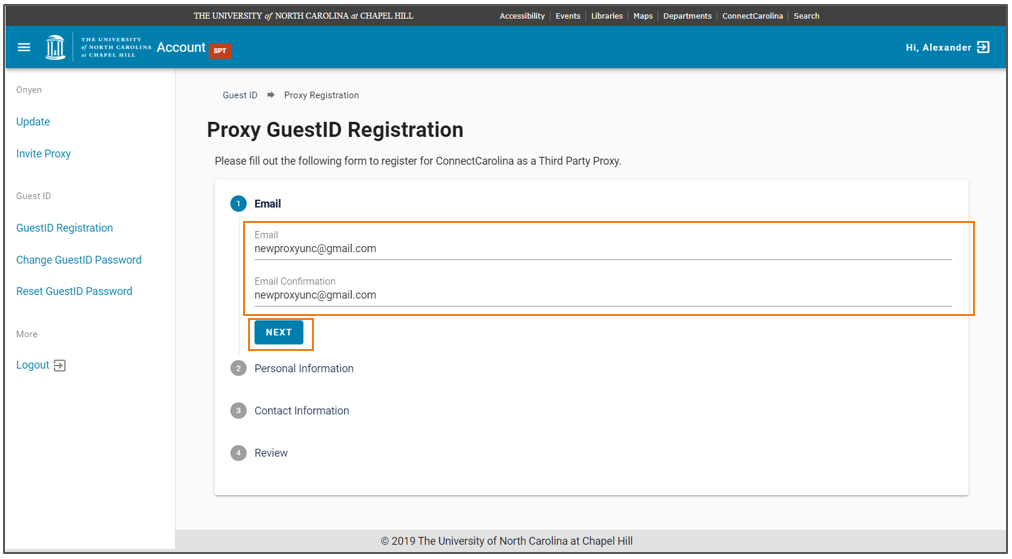
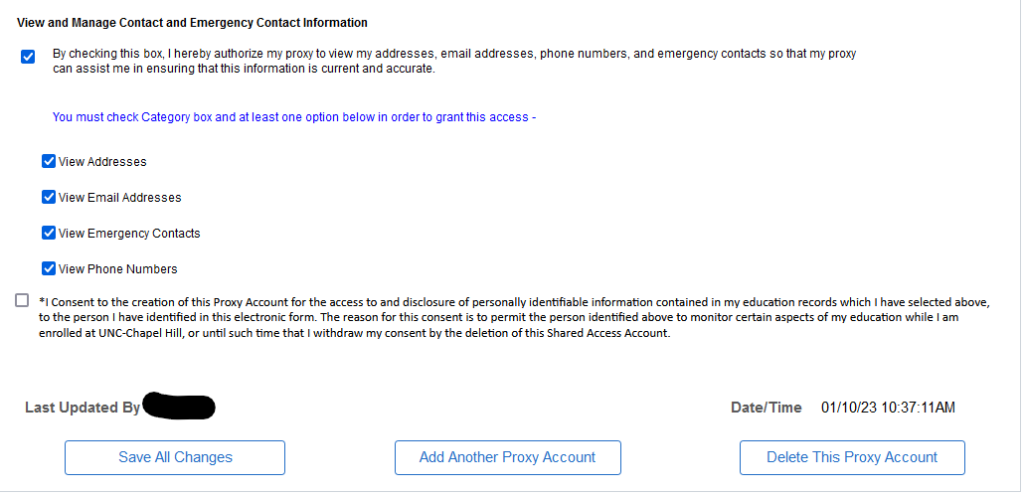
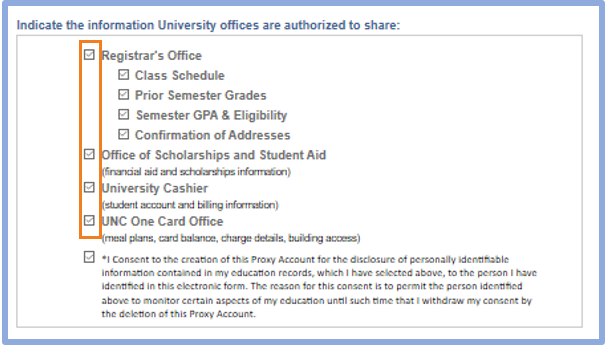
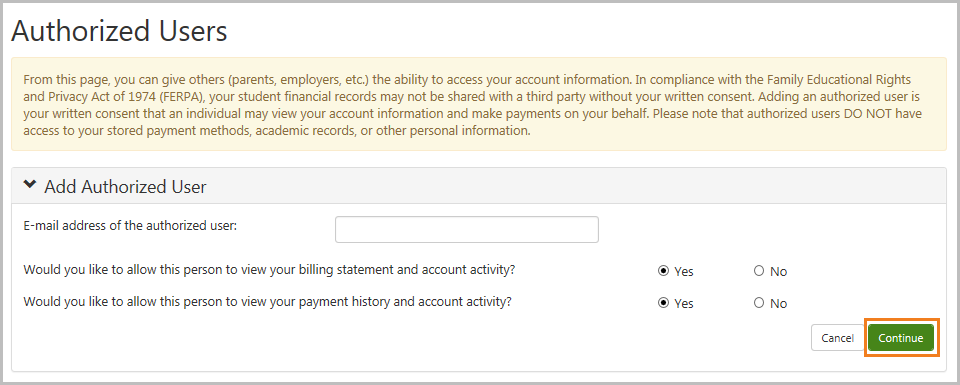
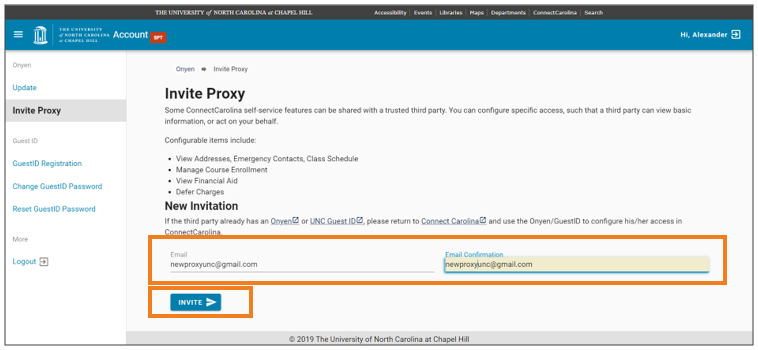
6. Enter the email address of the person you are giving access to and choose Yes for the information you want to share.

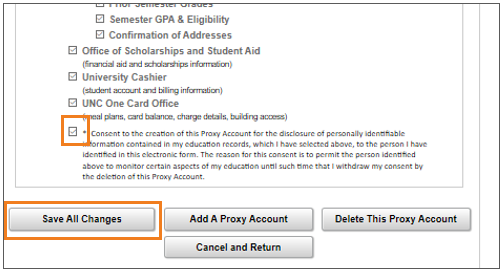
7.  Click the Continue button.

Agreement to Add Authorized User screen - Authorized Users questions

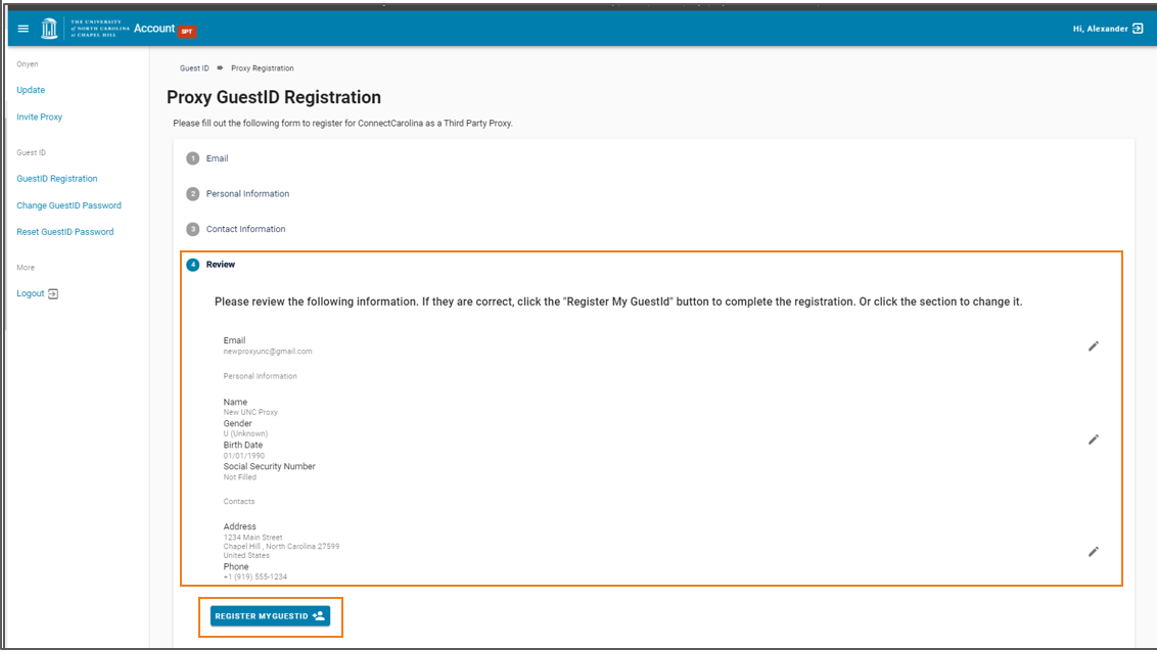
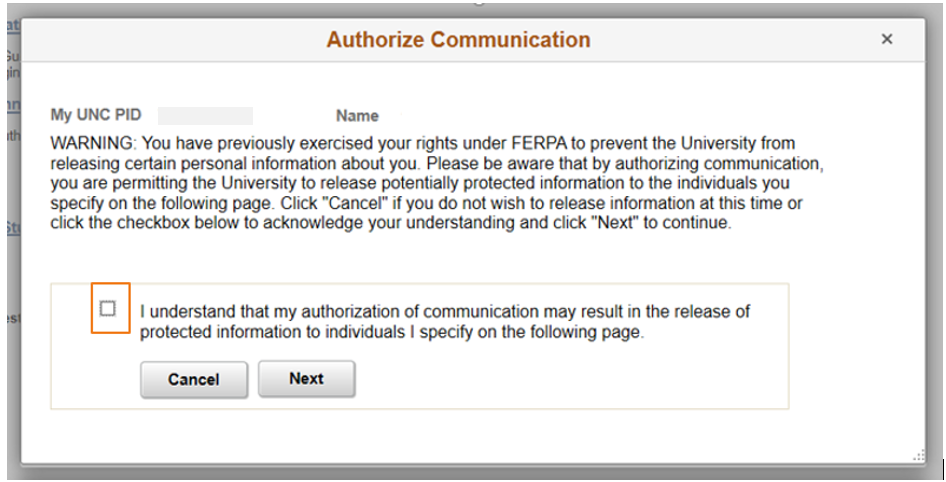
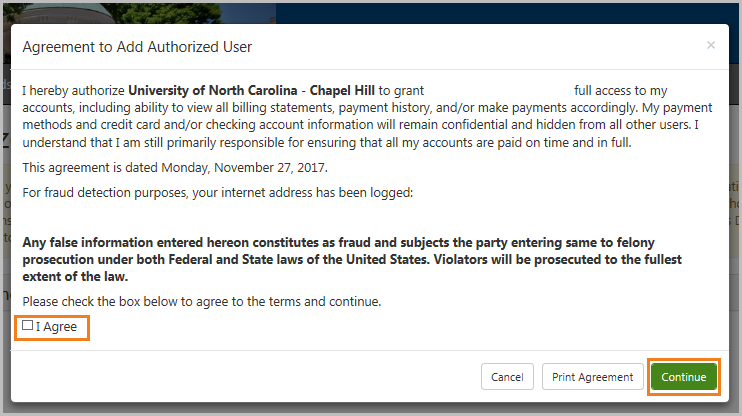
8.  On the Agreement to Add Authorized User screen, Check the I Agree box and click the Continue button.

Agreement to Add Authorized User screen- I Agree box

Result: The person you’ve made an authorized user receives two emails:

  1. An email letting him or her know that you granted access to your online student account.
  2. An email with a temporary password to use to log in the first time.  Once logged in, the person you gave access to will need to change the password to a permanent one.

Remember: Your authorized user is not required to use 2-Step Verification (Duo).

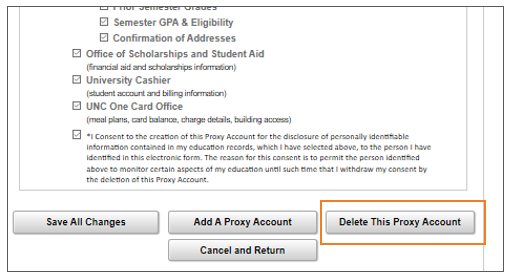
Delete an Authorized User

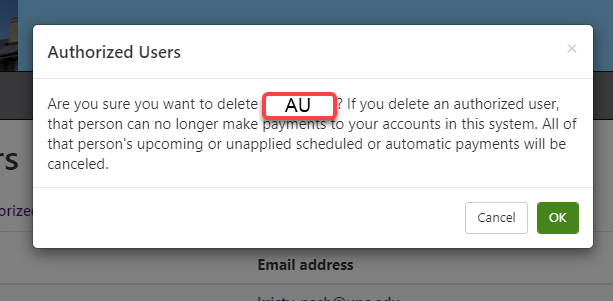
Once you delete an authorized user, that person can no longer may payments to your accounts in this system.  All of that person’s upcoming or unapplied scheduled or automatic payments will be canceled.  To delete that person as an authorized user:

  1. Complete steps 1- 5 above.
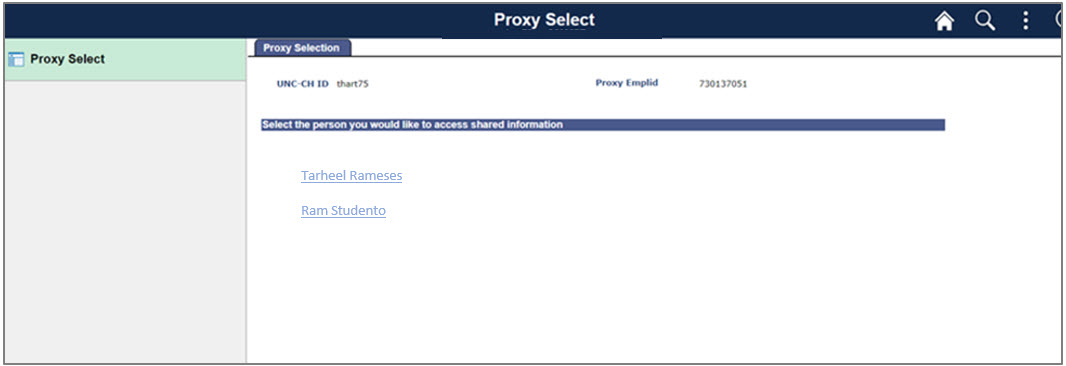
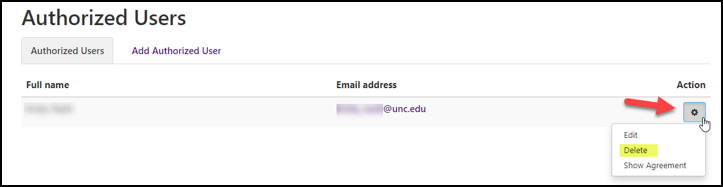
  2. Select the user whom you wish to delete as an authorized user.
  3. Click the Action button and select Delete.

Click Action button to see 3 options: Edit, Delete or Show Agreement

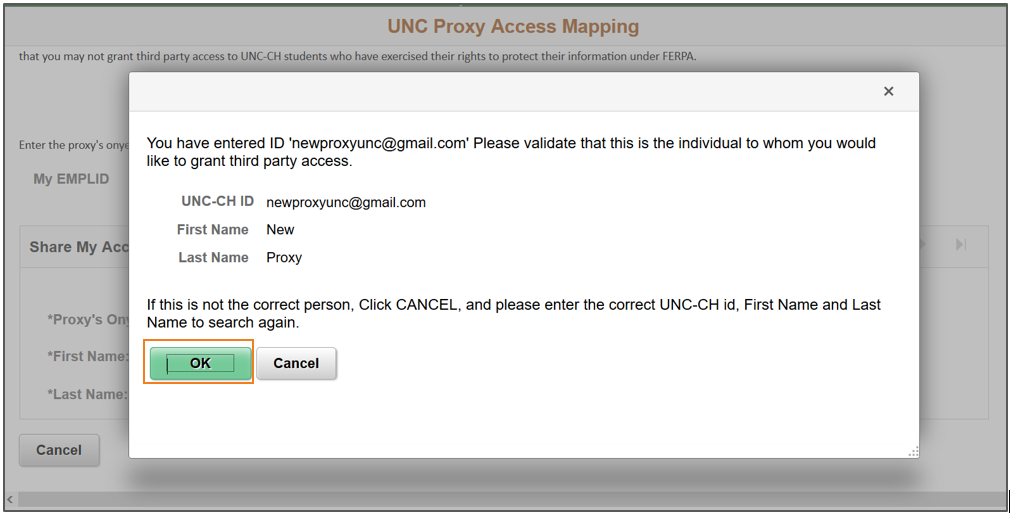
RESULT: You will see a message confirming that you want to delete that person as an authorized user.

3. Click OK.

Confirmation message that you want to delete an authorized user.

When you give someone access to see your non-billing information in ConnectCarolina, you set them up as a “proxy” user.  There are four total steps that you, and the person you are giving access to, need to complete.  As the student, you complete Steps I and III.  Then, the person you’re giving access to completes Steps II and IV. At a high level, it looks like this:

  1. Student invites someone to be a proxy.
  2. Person being given access registers as a proxy..
  3. Student grants access to the proxy.
  4. Person being given access logs in to ConnectCarolina.

Follow the process below to give someone access to see your non-billing information in ConnectCarolina.

Before you begin these steps, be sure that your pop-up blocker is turned off or disabled.

Note: If the person you are giving access to already has an Onyen or Guest ID, skip steps I and II and go straight to Step III (Student: Grants access to proxy)

I.  Student: Invite Someone to be a Proxy

1.   Log in to connectcarolina.unc.edu.
2.   From the Student Home Page, click the Share My Student Information link in the Students Home Page Links tileStudent Home Page Links with box around Share My Student Information option.
3. Click the Invite Individuals to Create a Guest ID to View Your Information in ConnectCarolina link..Invite Individuals to Create a Guest ID to View Your Information in ConnectCarolina link.
4.  Log in to the Authentication Required page using your Onyen and password.Log in to the Authentication Required page
5. Enter and confirm the proxy’s email address and click the Invite button.Screen to add Proxy's email address and Invite Proxy button
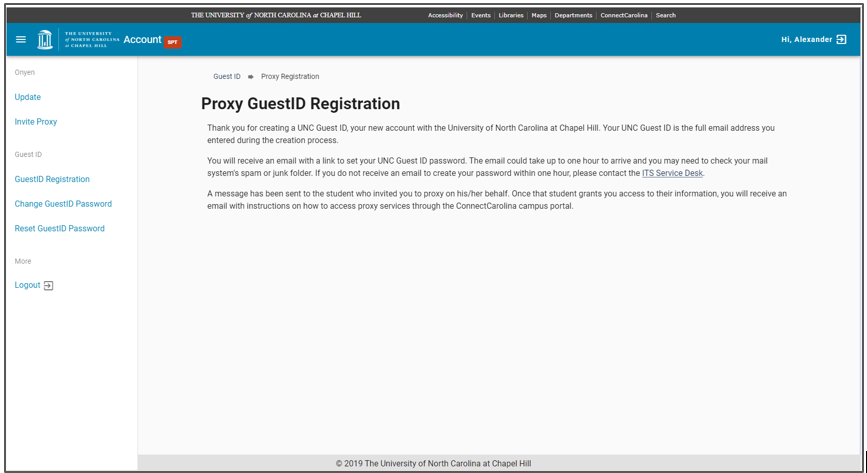
Result: Once the completed Proxy invitation form is submitted:
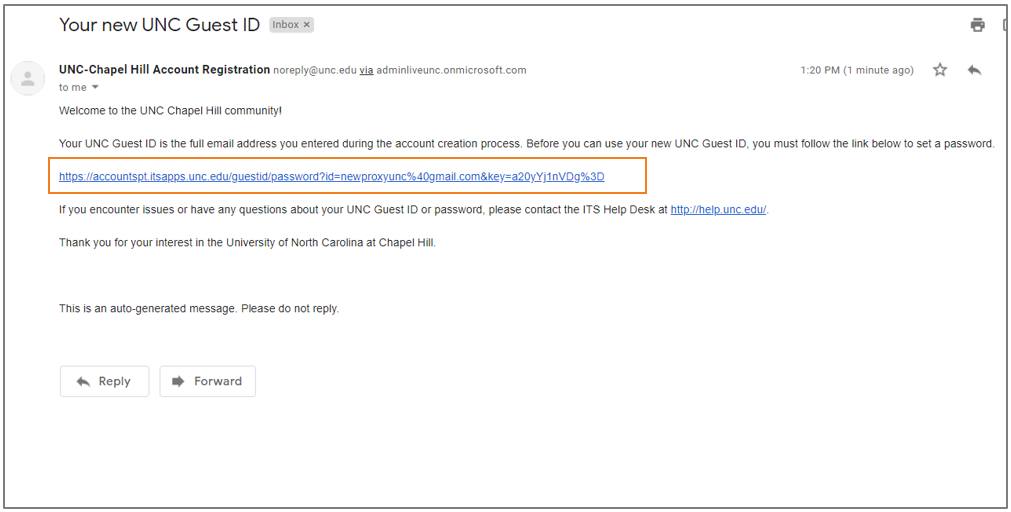
  • you, as the student, receive a confirmation page,
  • an email is sent to the person you want to give access to (see next step).

II. Person Being Given Access: Register as a Proxy

This information in this section is for the person (parent, guardian etc.) that the student wants to share information with.  

1.  You will receive an email with the subject line: Invitation to Register as a Proxy on Behalf of [Student Name]

2.  Click the link in the email to register as a Proxy and create a Guest ID.

email with the subject line: Invitation to Register as a Proxy on Behalf of [Student Name]

3.  Enter and confirm your (proxy) Email Address and click the Next button.

4.  Complete the Personal Information fields and click the Next button.

Complete Personal Information screen for Proxy

5. Complete the Contact Information fields and click the Next button.

Second Complete Personal Information screen for Proxy
6. Review the information fields and if they are correct, click the Register My GuestID button.
Screen to review the information fields and then click the Register My GuestID button
Results:
  • Proxy GuestID Registration confirmation screen appears.
  • You (as the proxy) receive a Proxy GuestID Registration email.

  GuestID Registration confirmation screen

GuestID Registration confirmation screen


  Proxy GuestID Registration email

Proxy GuestID Registration email with link to create Password

7. Click the link in the email and follow the instructions to create a password.
8. Click the Submit button.
Result: You will receive a password reset email with a temporary password. The email includes a link to the ‘Change Password’
9. Create and confirm a new password and click Change Password.
Create and confirm a new password screen
Result: The student receives an email indicating that you (proxy) set up an account. The email contains instructions for the student to proceed with granting access.

III.  Student: Grant Access to Your Proxy

  1. From the Student Home Page, click the Share My Student Information link in the Students Home Page Links tile.
  2. Enter the following information for the person you are giving access to:  proxy’s Guest ID (email) or Onyen (if the proxy has an Onyen), first name and last name.
  3. Click the Validate ID button.Share My Student Information screen for student to validate Proxy email
    Result: You’re asked to validate that you want this individual to be granted Proxy access.

4. Click the OK button.

Screen for student to confirm that they want to grant Proxy access

5. Complete the Share My Access portion of page by checking the boxes for the type of access that you are granting to the Proxy.

6. Click the Save All Changes button.


IV.  Proxy:  Log in to ConnectCarolina Student Center

This information in this section is for the person (parent, guardian etc.) that the student is giving access to.

1.    After you receive an email confirming access to the student’s account, log in to connectcarolina.unc.edu and click the Student Data tile.

ConnectCarolina Student home page with box around the Student Data tile.

If you, the proxy, have access to information for a single student, you’re taken directly to a page with links to the various services (such as view schedule and enrollment) that you are now authorized to access.  (The list varies depending on the options the student selected.) Click the link for the information you want to see.

UNC Proxy Access Center screen

If you have access to the information for multiple students, you will go to Proxy Select page which contains a list of students who granted access to you. Click the name of the student’s whose information you want to see.

Proxy Center screen with multiple students to choose from

Once you’ve selected the student, you can click the links on the next page to see the information your student has granted you access to.

As a student, you can set up a PIN for anyone you want the University to share your student information with, such as your parents or guardians. When you set up the PIN you’ll also be able to choose what type of information you want the other person to be able to get, such as your addresses, your GPA for the semester, and the balance on your One Card account.

Once someone else has a PIN that you’ve set up, University staff can share information about:

  • Your class schedule
  • Your grades from the last semester
  • Your current semester GPA and academic eligibility
  • The current address we have on file for you
  • Your financial aid and scholarship information
  • Your student account and billing

Keep In Mind:

  • You get to decide who has permission to get your information.
  • You decide what information that person can be given.
  • You create the PIN for the person you want to share information with.  It’s up to you to let them know what their PIN is.


Follow these steps to set up the PIN and decide what information University staff can share with that person.

  1. From the Student Homepage Links tile, click the Share My Student Information link.

Student Homepage Links tile, Share My Student Information link

2.  From the Share My Student Information page click the Authorize University Offices to Communicate with Individuals

Share My Student Information page

Result: If you previously exercised your rights under the Family Educational Rights and Privacy Act (FERPA), you need to acknowledge this exception to your invoked FERPA status.  This screen will not appear again.

3. Check the Authorize Communication box and click the Next button.

screenshot of Authorize Communication box

4. On the Authorize Communication page, enter the First Name and Last Name of the person you want the University to share information with.

5. Enter that person’s email address.

6. Create a 4 digit PIN for that person using the following guidelines:

    • Can only be numbers
    • Can’t be 1234
    • Can’t use the same 4 numbers (e.g. 2222)

Remember to give the PIN to the person you’re giving access to and notify them they need their PIN when they’re communicating with University Offices.

Authorize Communication page

 7. Check the boxes for information you want University staff to share with the individual (Proxy).

  • To share student information from the Registrar’s Office, you need to click on the Registrar’s Office checkbox AND the checkboxes for the specific information you want to share with the individual.
  • Office of Scholarship and Student Aid (financial aid and scholarship information)
  • University Cashier (student account and billing information)
  • UNC OneCard Office (meal plans, card balances, charge details, building access)

Authorize Communication page showing data options to share.

8. Check the Consent to the creation of the Proxy Account box.

  • If you make any changes to your proxy PIN or access, the Consent box re-opens and the user must check the “Consent” again

9. Click the Save All Changes button.

Authorize Communication page-Save All Changes button

Result: The information is immediately available to the University Offices.

The Proxy History section keeps track of any changes you make to your proxies or their access.

If you leave the page and come back later to make changes, you’ll need to check both the consent checkbox and the Save All Changes button again. You can update the email address, PIN and the information you want to share with an individual any time.


IF you want to set up a PIN for another person, click the Add a Proxy Account button at the bottom of the page and repeat the steps above.  Each person will have a separate page.


If you want to take away access from someone, use the Delete Proxy Account button at the bottom of that person’s page.  As soon as you delete a proxy account, that person will no longer have a PIN to access your information and University Offices won’t share information with that person.  The person will remain in your Proxy History section but will show as deleted.

Authorize Proxy screen with Add and Delete Proxy buttons