
InfoPorte Administrators
As an InfoPorte Administrator, you will add and remove user permissions. Permissions determine what InfoPorte users can do in the system. Permissions give faculty and staff access to only the parts of InfoPorte they will use to do their jobs, without granting them any extra access they do not need.
InfoPorte allows administrators to grant access to a specific function or a particular screen at various levels of detail:
- Major entity level (such as UNC-Chapel Hill, UNC Foundations, or UNC General Administration)
- School or division level (such as Finance and Administration, School of Medicine, College of Arts and Sciences, Workforce Strategy)
- Department level (such as Department of Medicine, Facilities Services, Chemistry Department)
- Sub-department level
- Individual project level (Grants)
- Individual employee level (such as John Doe or Jayne Smith)
As with other University systems, InfoPorte users must follow all related policies and regulations when they access and use InfoPorte. Everyone who uses InfoPorte has to sign the Terms of Use agreement found at https://ccinfo.unc.edu/terms-of-use-for-administrative-systems/. In addition, faculty and staff are required to report any unauthorized access or misuse of University information contained in InfoPorte immediately to the Information Technology Services (ITS) Information Security Office by calling the UNC ITS Help Desk (919-962- HELP).
- To see the current list of Infoporte Admins, please check the Infoporte Admin List.
- Active Infoporte Admins can grant Infoporte admin access within their department ranges by granting the “User Edit” function.
- To request Infoporte admin access if your department doesn’t currently have an active Infoporte Admin, please request access via ServiceNow using the Infoporte Access Request Form. Put requesting Infoporte Admin and for which unit, include the normal signatures, and the ERDS team will take it from there.
Do you need information about:
Infoporte permissions are based on a combination of user, permission level, and function.
Infoporte users must have at least one function. Functions determine which screens and data users can see, relative to a particular unit.
| Pool | Function | Description |
|---|---|---|
| Cores | Consolidated Sales | Access Sales and NIH reports for multiple Cores. |
| Core Edit | Administer a Core: Add Items and Components, set and change prices, set and change discounts, set and change custom emails, and get reports for a Core. | |
| Core Import | Batch entry of multiple orders for a core. Orders must be formatted corrected. | |
| Cores PI Chartfields | Assign valid Chartfield Strings for a PI and give those Chartfield Strings beginning and ending dates. The Chartfield(s) will show up on the order form when the PI’s name is entered on the order form. | |
| Faculty | TimeTrex | Allows access to the TimeTrex application. |
| Faculty Report Views | Access the Faculty Review History | |
| Faculty Productivity | Allows access to the following: Curvita, Faculty Individual Profile and ReachNC. | |
| Faculty Review | Allows access to Faculty Individual Profile, Faculty Activity Report, Faculty List, ReachNC, Faculty Review History and Faculty Requests. | |
| Faculty Solicit | Allows access to the Request Edit page and the Solicit button. | |
| Finance | Budget Reporting | Pull reports on the Financial Budgeting process |
| Budget Requests | Place requests for Budget increases or reductions | |
| Finance Requests | Initiate actions in the Finance system | |
| Financial Reporting | View overview information for the Ledgers | |
| Dept Accounting | Cost Code Edit | Grants access to create and edit cost codes through the Create and Edit Cost Code pages. |
| Cost Code Tagging | Grants ability to tag transactions with a Cost Code. | |
| Soft Encumbrance | Accesses the soft encumbrances data. Allows access to the following Accounts pages: Soft Encumbrance | |
| Journal Transactions | View detailed revenue and expense transactions | |
| Journal Rollup | View rolled up information for ledgers | |
| BMS Reports | Access the Budget Management System Reports | |
| HCM Payroll PAAT | Access to Labor Expense Summary tab and Salary Funding tab within the HR system | |
| Positions | View details of positions within the HR system | |
| HR Reporting | Access the Reports tab under the HR section | |
| Requests | Initiate or act upon HR actions in the Infoporte system | |
| Employee Views | Accesses the employees’ data. Allows access to the following HR pages: Employees, Employee Profile, Employee Request, HR Request, Forms, Payroll | |
| Home | Dashboard | Grants access to the Faculty Dashboard. When this function is granted the Dashboard will be the landing page |
| School Info | Provides access to the School Info page for the assigned school or unit | |
| Inbox | Calendar Edit | Create and edit calendar entries |
| Calendar View | View calendar entries | |
| Request Lock | Employ the lock capability on requests. Locking prevents further editing of a request. Unless unlocked, it may only be approved or disapproved. | |
| Request Views | View requests in other inboxes | |
| Settings | Content Edit | Edit the content that displays under the School Info tab |
| Group Edit | Create and edit groups used within workflow routes | |
| Route Edit | Create and edit workflow routes | |
| User Core Edit | Create and edit a Core | |
| User Edit | Perform Access Request Coordinator (ARC) tasks within Infoporte | |
| Student | Student Views | View the Term Enrollment, Degree Candidate, and Degree Recipient reports |
| Reports | Access the Reports tab under the Student section | |
| Tools | Contract Create | Create Contracts under the Contract tab |
| Contract Edit | Edit existing contracts | |
| Contract Invoices | Create contract invoices under the contract tab | |
| Contract Lists | View the list of Contracts and Contract Details | |
| Data Dictionary Edit | Edit the Data Dictionary through the Data Dictionary tab in Infoporte | |
| Reserve Carolina Inn | Make reservations of University facilities within the Carolina Inn | |
| Reserve Parking | Reserve parking passes | |
| Room | Reserve meeting rooms | |
| Resource Edit | Edit reservations resources | |
| Source End Date | Receive email notifications about Faculty that are approaching this date | |
| Termination Date | Receive email notifications about Faculty that are approaching this date | |
| Visa End Date | Receive email notifications about Faculty that are approaching this date |
The permissions tab (located at Settings > Permissions > Access) allows the Infoporte admin to grant the permissions & functions specified on the Access Request Form.
The layout of the permissions list is as follows:
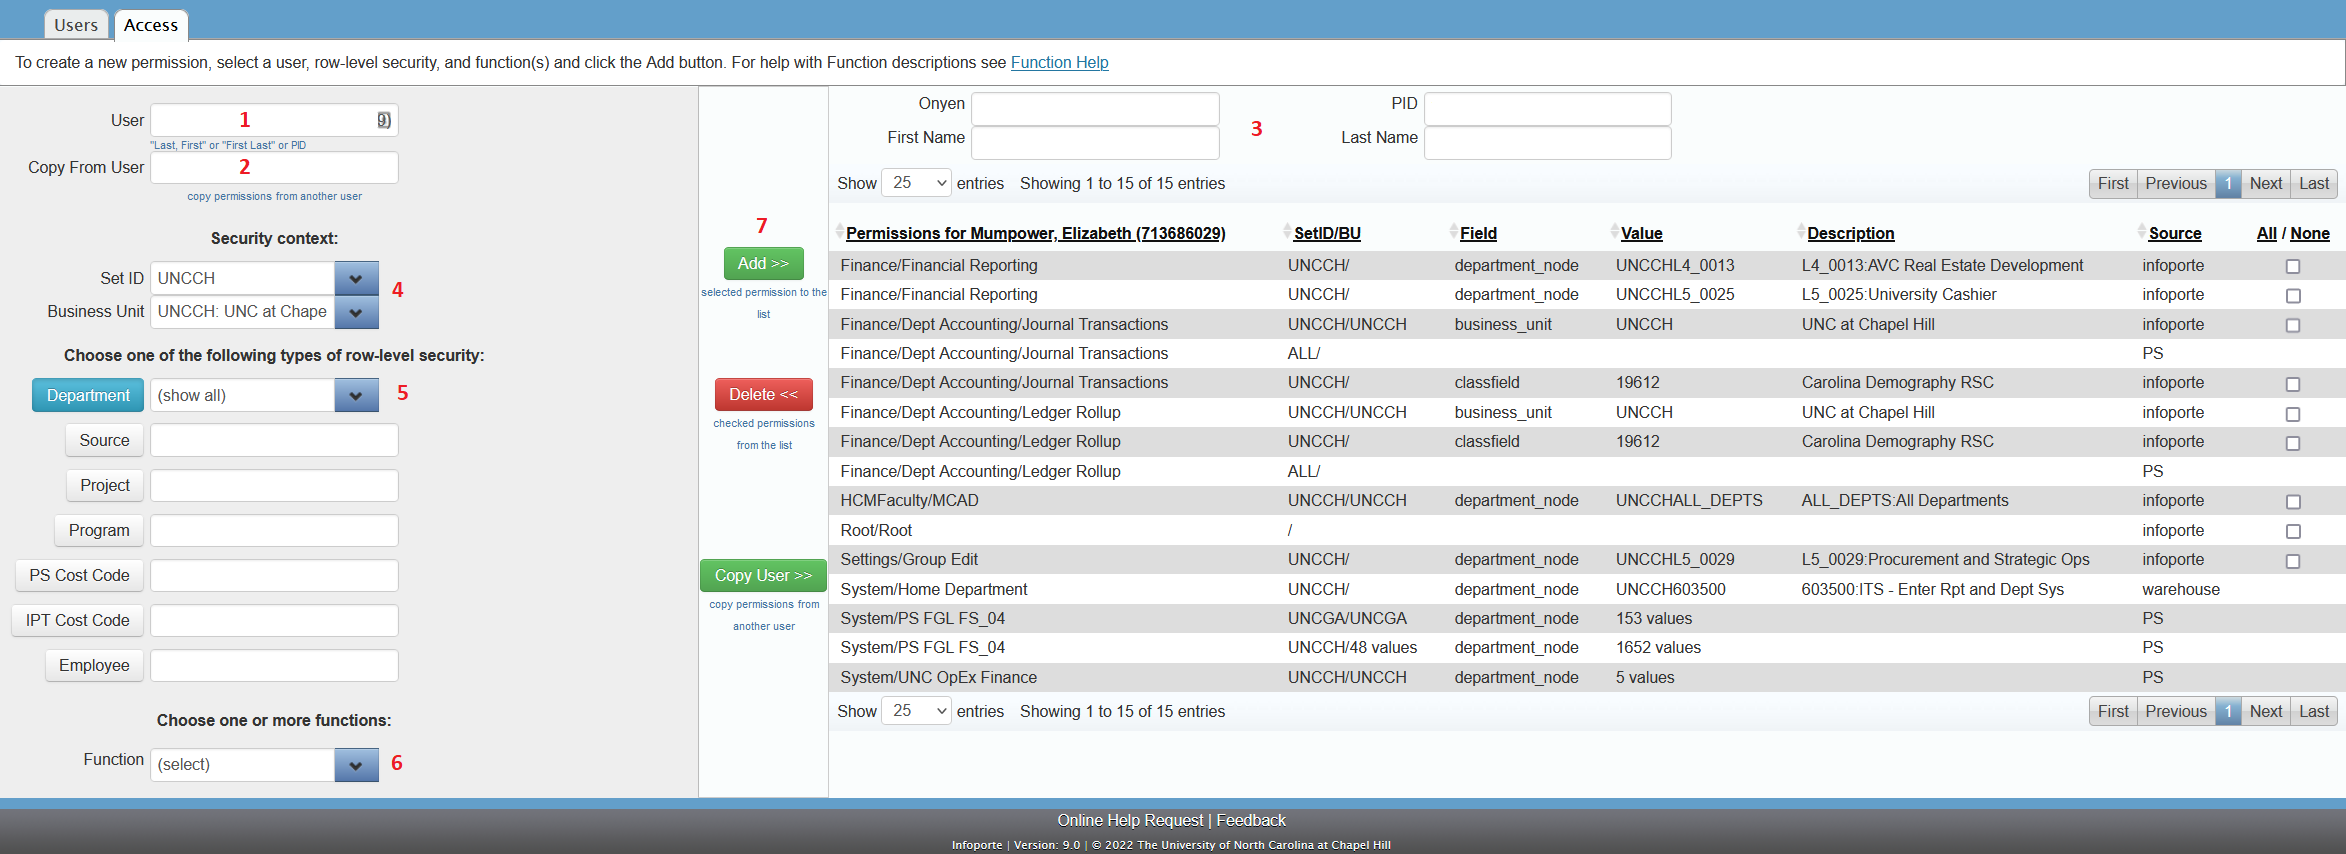
| Number | Field | Definition/Action |
|---|---|---|
| 1 | User | Look up, or enter, the name of the person you are giving access to. You can enter the name in the formats "Last, First", "First Last", or as a PID. Note: If you pause while entering text in the User field, names in the system that match what you have typed so far display below the text box. Choose the person you need from the list. Result: The system displays the user's name, Onyen, and PID on the right side of the screen, along with any permissions they already have. |
| 2 | Copy from user | Input user with permissions you would like to copy to new user. |
| 3 | User info | Shows information related to user to whom you are granting permissions |
| 4 | Security context | setid (almost always UNCCH); business unit – if something besides UNCCH is needed, this is a ticket for Foundation access. |
| 5 | Department | This is the department, mcu, or level that the user needs permission for. [The other fields under department can be used for specific access. Department is most common. For more info, see “Permission Parameters” below] |
| 6 | Function | Function: Function to be granted based off access request form. See above table for description of functions. |
| 7 | Add & Delete | Use these buttons to add, delete, or Copy User permissions. |
The permission parameters are:
| In this field: | Do the following: |
|---|---|
| Department | Click the down arrow to show a "tree" of departments, and choose the departments the person should have access to see in InfoPorte. Click the plus signs to drill down from higher to lower levels until you find the departments you're looking for. Mark the checkbox beside a department to select it. |
| Source | If you want to limit the person's access to a particular source, type the source in this field. Note: There is no spot for source information on the Access Request Form, but you may receive it separately. |
| Project | If you want to limit the person's access to a particular project, type the project ID in this field. |
| Program | If you want to limit the person's access to a particular program, type the program ID in this field. |
| PS Cost Code | If you want to limit the person's access to a particular ConnectCarolina cost code, type the cost code in this field. |
| IPT Cost Code | If you want to limit the person's access to a particular InfoPorte cost code, type the cost code in this field. |
| Employee | If you want to limit the person's access to a particular employee, type the employee ID in this field. |
Routes and groups provide the pathways and stop points for Infoporte requests.

The Routing screen sets up and edits the Routes which determines each stop or segment along the prescribed route. The screen consists of:
- The name of the route (#1 above).
- The Department/MCU for which the route exists (#2 above).
- The Category the Route falls under (#3 above) – can filter by Category as well.
- Details of the Route Approvers for each stop (#4 above).
- Check boxes to select individual rows for deletion (#5 above).
To help you research what Routes currently exist and what users are in particular routes, use the Route Users page.

Create Route
Click “New Route” at the top left of the Route tab.
Fill out information in tab. Choose a specific category:
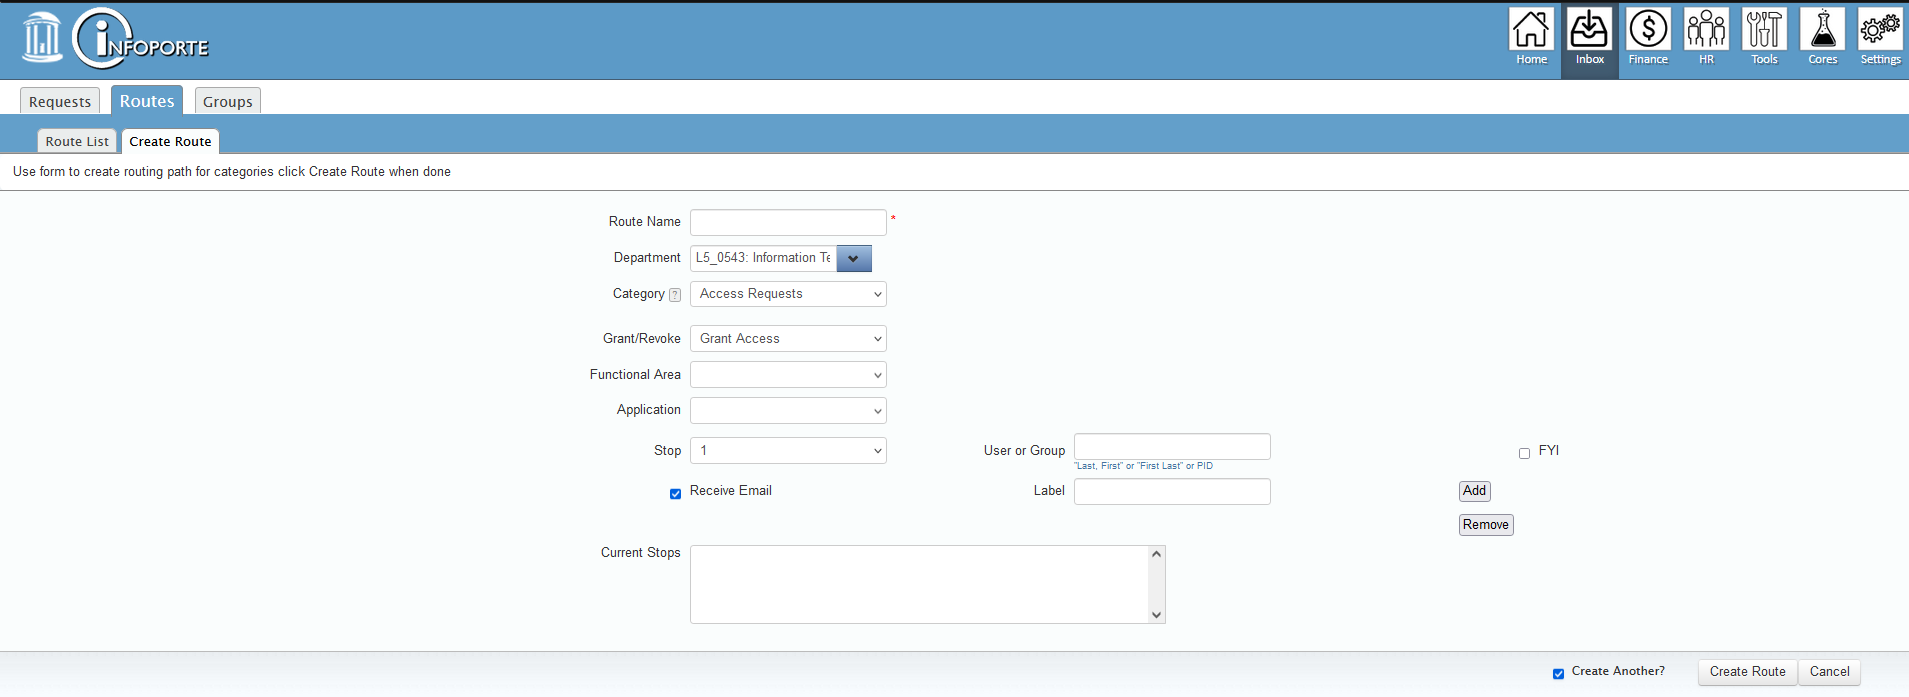
Current stops can be either individual people or GROUPS. We recommend using a GROUP so there is coverage if an individual is out of the office or terminates.
The Route Create screen sets up an individual Route which determines each stop or segment along the prescribed route. The screen consists of:
- The name of the route.
- The Department for which the route exists
- The Category the Route falls under.
- Stop number for User to add.
- Receive email: If checked, user receives an email each time they have a message for this stop.
- User or Group will go into Current Stops. These are approvers for each stop. Click add when you have this filled in.
- Click “create route” when ready to create route.
Edit Route
To edit a route, click on the route from the “Route List” list. Update, then “Save Changes.”
Note: When a route is updated, that update will be in place for new requests. Any requests that are in process at the time of the route was updated will continue to process with the “old” route.
Click “New Group” at the top left of the Groups tab.

Fill out the information in the New Group tab.

To help you research what Groups currently exist and what users are in particular groups, use the Groups Users page.

Billing Processes for Cores
Payment types
Core orders can be paid for in three ways: internal Chartfield string, Purchase Order or Credit Card.
Orders placed by internal (UNC) customers should always be paid for using a valid Chartfield String that has budget.
External orders can be paid using a Purchase Order or a Credit Card.
Purchase Orders are normally paid by check, sent directly to the core that the purchase was made from. The core accountant collects payment and marks the order Posted when the check is received and deposited.
Credit Card payments are requested when the order reaches Completed status. At this point the customer is emailed a payment request. The customer logs back onto Infoporte, views the invoice, confirms the billing address and amount, then is transferred to the TouchNet credit cart merchant site that UNC uses. Touchnet asks for a full address for payment validation, but only uses the zip code of the address to validate the credit card. If a credit card payment fails it is usually because the zip code on the address does not match the zip code associated with the credit card.
Internal order feed process
Core Administrators should never mark an internal order ‘Posted’ unless there is a special condition. All internal orders marked Complete are moved to Posted automatically by the monthly feed process. If an order is moved off Complete status, funds will not be transferred between departments to pay for the order.
Internal orders paid using a Chartfield string are processed once per month. Usually around the 24th of the month all internal orders at Complete status are moved to Posted status as the multiple-day feed process begins.
Chartfield strings are checked for validity and then for budget before each order is accepted into Peoplesoft where the money transaction occurs. If either the Chartfield String is bad or budget does not exist, then the order is paid from the customer’s department, but from what the accountants call a Suspense Fund. So, the money comes from the department, but from an account that is shared. Customers whose orders are paid from their department’s suspense fund get an email sent to them telling them what was wrong with the Chartfield string. In order to correct this, the department accountant has to create a correcting journal entry in Peoplesoft.
Credit Card Late Payment Notices
A customer that pays using a credit card is asked to pay via an email when their order reaches Complete status. If the order is not paid after 30 days (and for every 30 days after until it is paid), a reminder email is sent. These emails will not stop until their order is marked Posted or Uncollectible.
Manage A Core
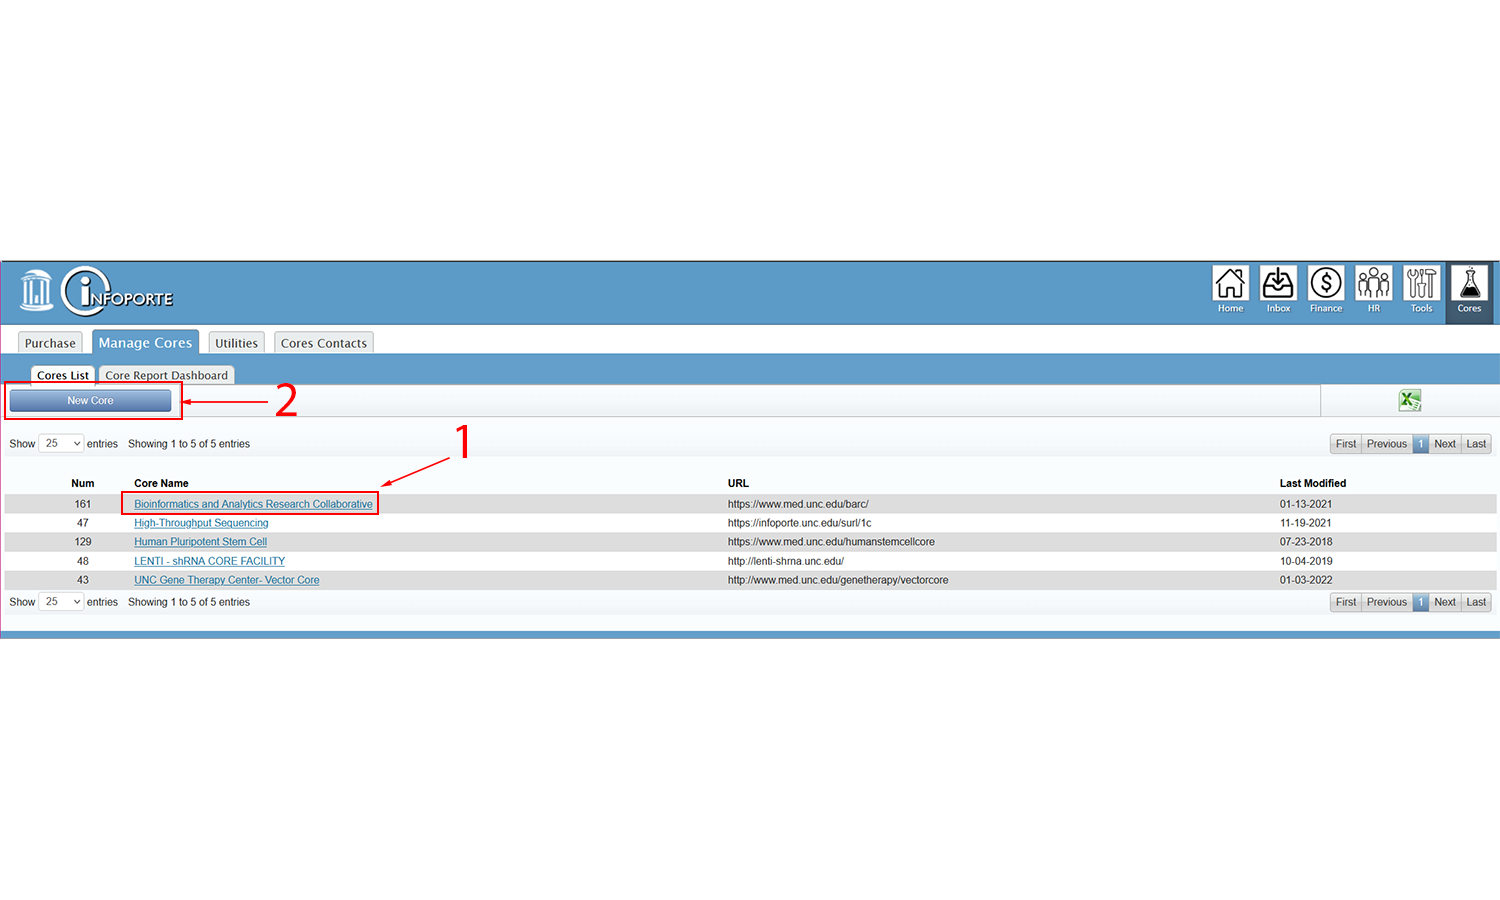
The Manage Cores screen lists all available cores. To choose a core, click on the Core title.
- To choose a core, click on the title(#1 above).
- To create a core, click on the New Core button(#2 above).
Note: You will only see cores you create or have access to.
Creating a Core
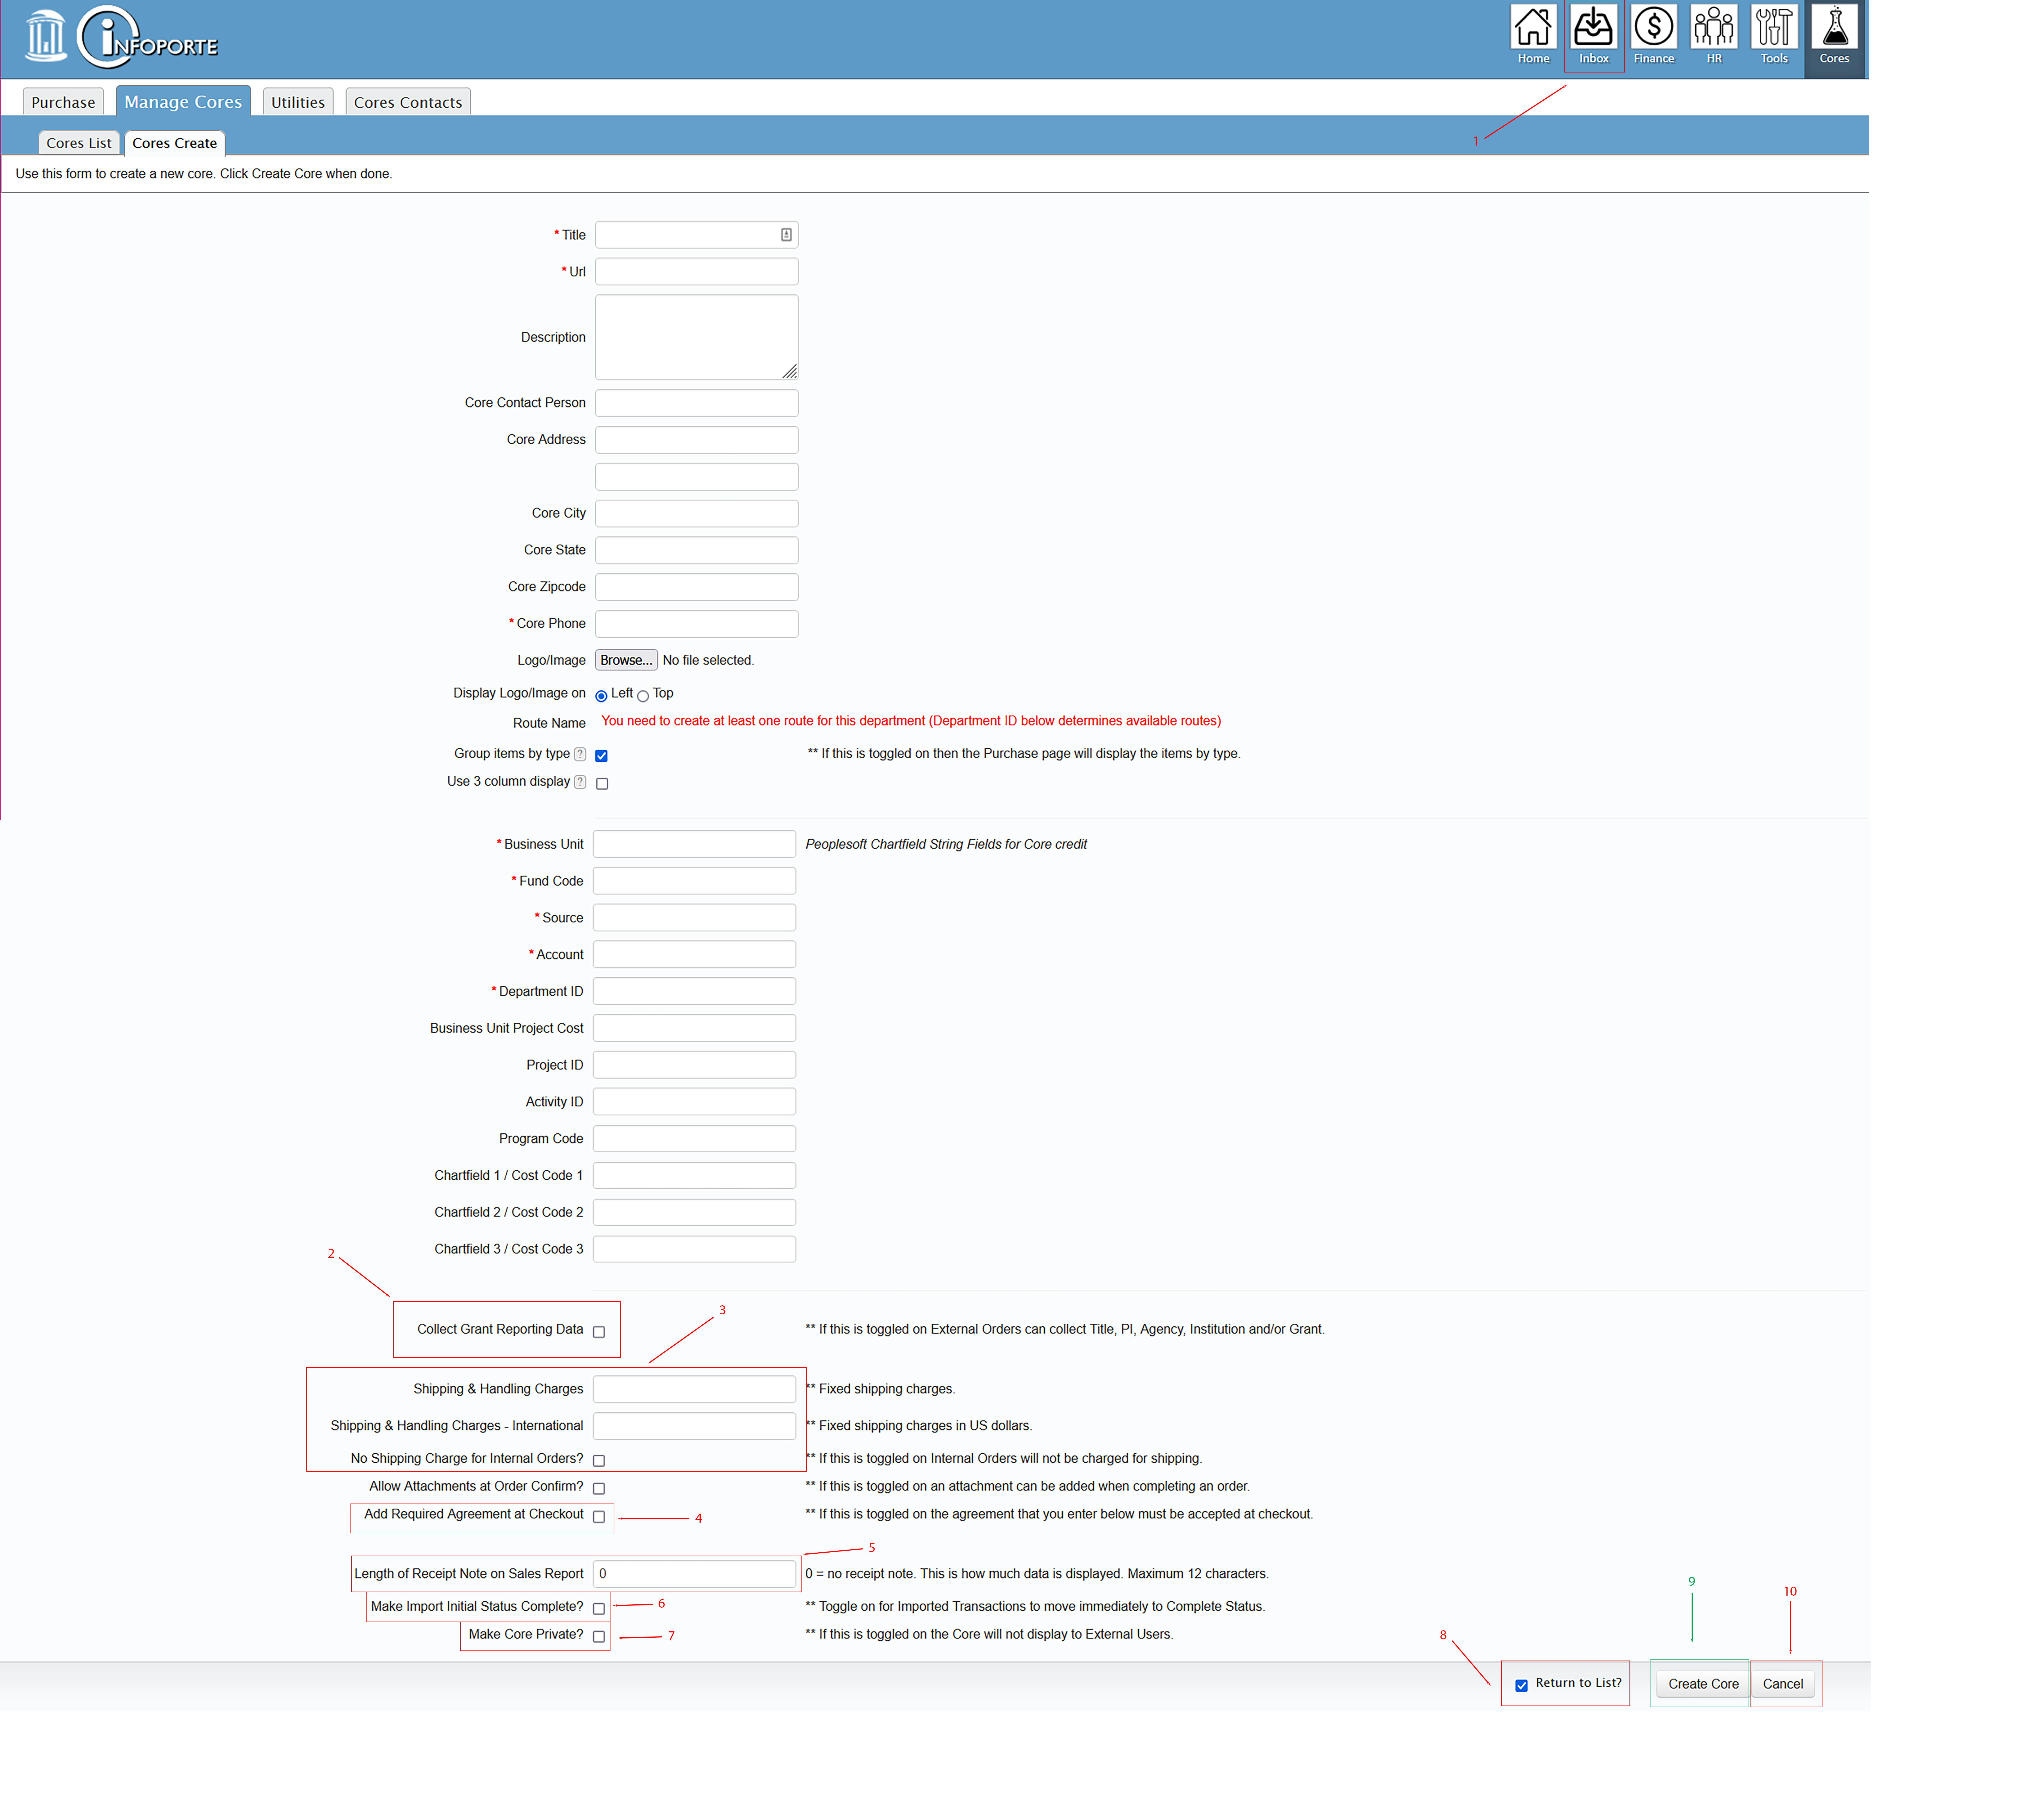
The Create Core screen enables you to create cores. To create a core, fill out the required fields (* above). And we strongly suggest that you enter a Core Contact – this information appears on the invoices. Enter the Peoplesoft Chartfield where funds will be deposited from internal sales for your core. When all your core data has been entered click on the ‘Create Core’ button (#4 above).
Although not required to create a core, but definitely required for core sales to happen, the Route Name (#1 above) is needed to facilitate sales. See Routing for more information on how to set up a Recharge route.
If you would like to collect Grant information click the ‘Collect Grant Reporting’ checkbox (#2). You can then select one or all of the following to collect: Title, Principal Investigator, Agency, Institution, and Grant.
If your product is shipped you can specify shipping charges on this page, both domestic and international (#3).
Some cores require an agreement to be read and agreed to before an order can be placed. If this is true for your core, then select the ‘Add Required Agreement at Checkout’ checkbox (#4). You will then be able to enter the text of the agreement.
The Sales Report lets you see the first past of each order’s Receipt Note if you want. Some cores keep internal reference numbers in the Receipt Note and want to see them on their Sales Report. If you want to see the first part of the Receipt Note, tell us how many characters 1-12 you would like to see on the Sales Report (#5).
If you are Importing Orders into Infoporte Cores (see below), you can opt to make all the imported orders immediately go to ‘Complete’ status (#6). Before you set this option, please discuss the implications of this with your Infoporte Administrator.
Marking a core ‘Private’ assures that customers external to UNC cannot see or purchase from your core. If your orders will all be internal (UNC customers using a Chartfield), then click this checkbox (#7).
Remember to check the ‘Return to List’ checkbox (#8), or the page will reload and allow you to adjust your core. See Editing Cores for more information.
When all your core data has been entered then click on the ‘Create Core’ button (#9 above).
Choosing ‘Cancel’ (#10) will return you to the Manage Cores page
Editing a Core
The Edit Core screen is the same as the Cores Create screen, it enables you to change core information. To edit a core, simply add/edit your information and click on the ‘Save Changes’ button (in the same screen location as #9 above). Make sure that all required fields (* above) contain data.
Although not required to create a core, the Route Name (#1 above) is needed to facilitate sales. See Routing for more information on how to set up a Recharge route.
Remember to check the ‘Return to List’ checkbox (#8 above), or the page will reload and allow you to further adjust your core.
Choosing ‘Cancel’ (#10 above) will return you to the Active Items page.
Active Items
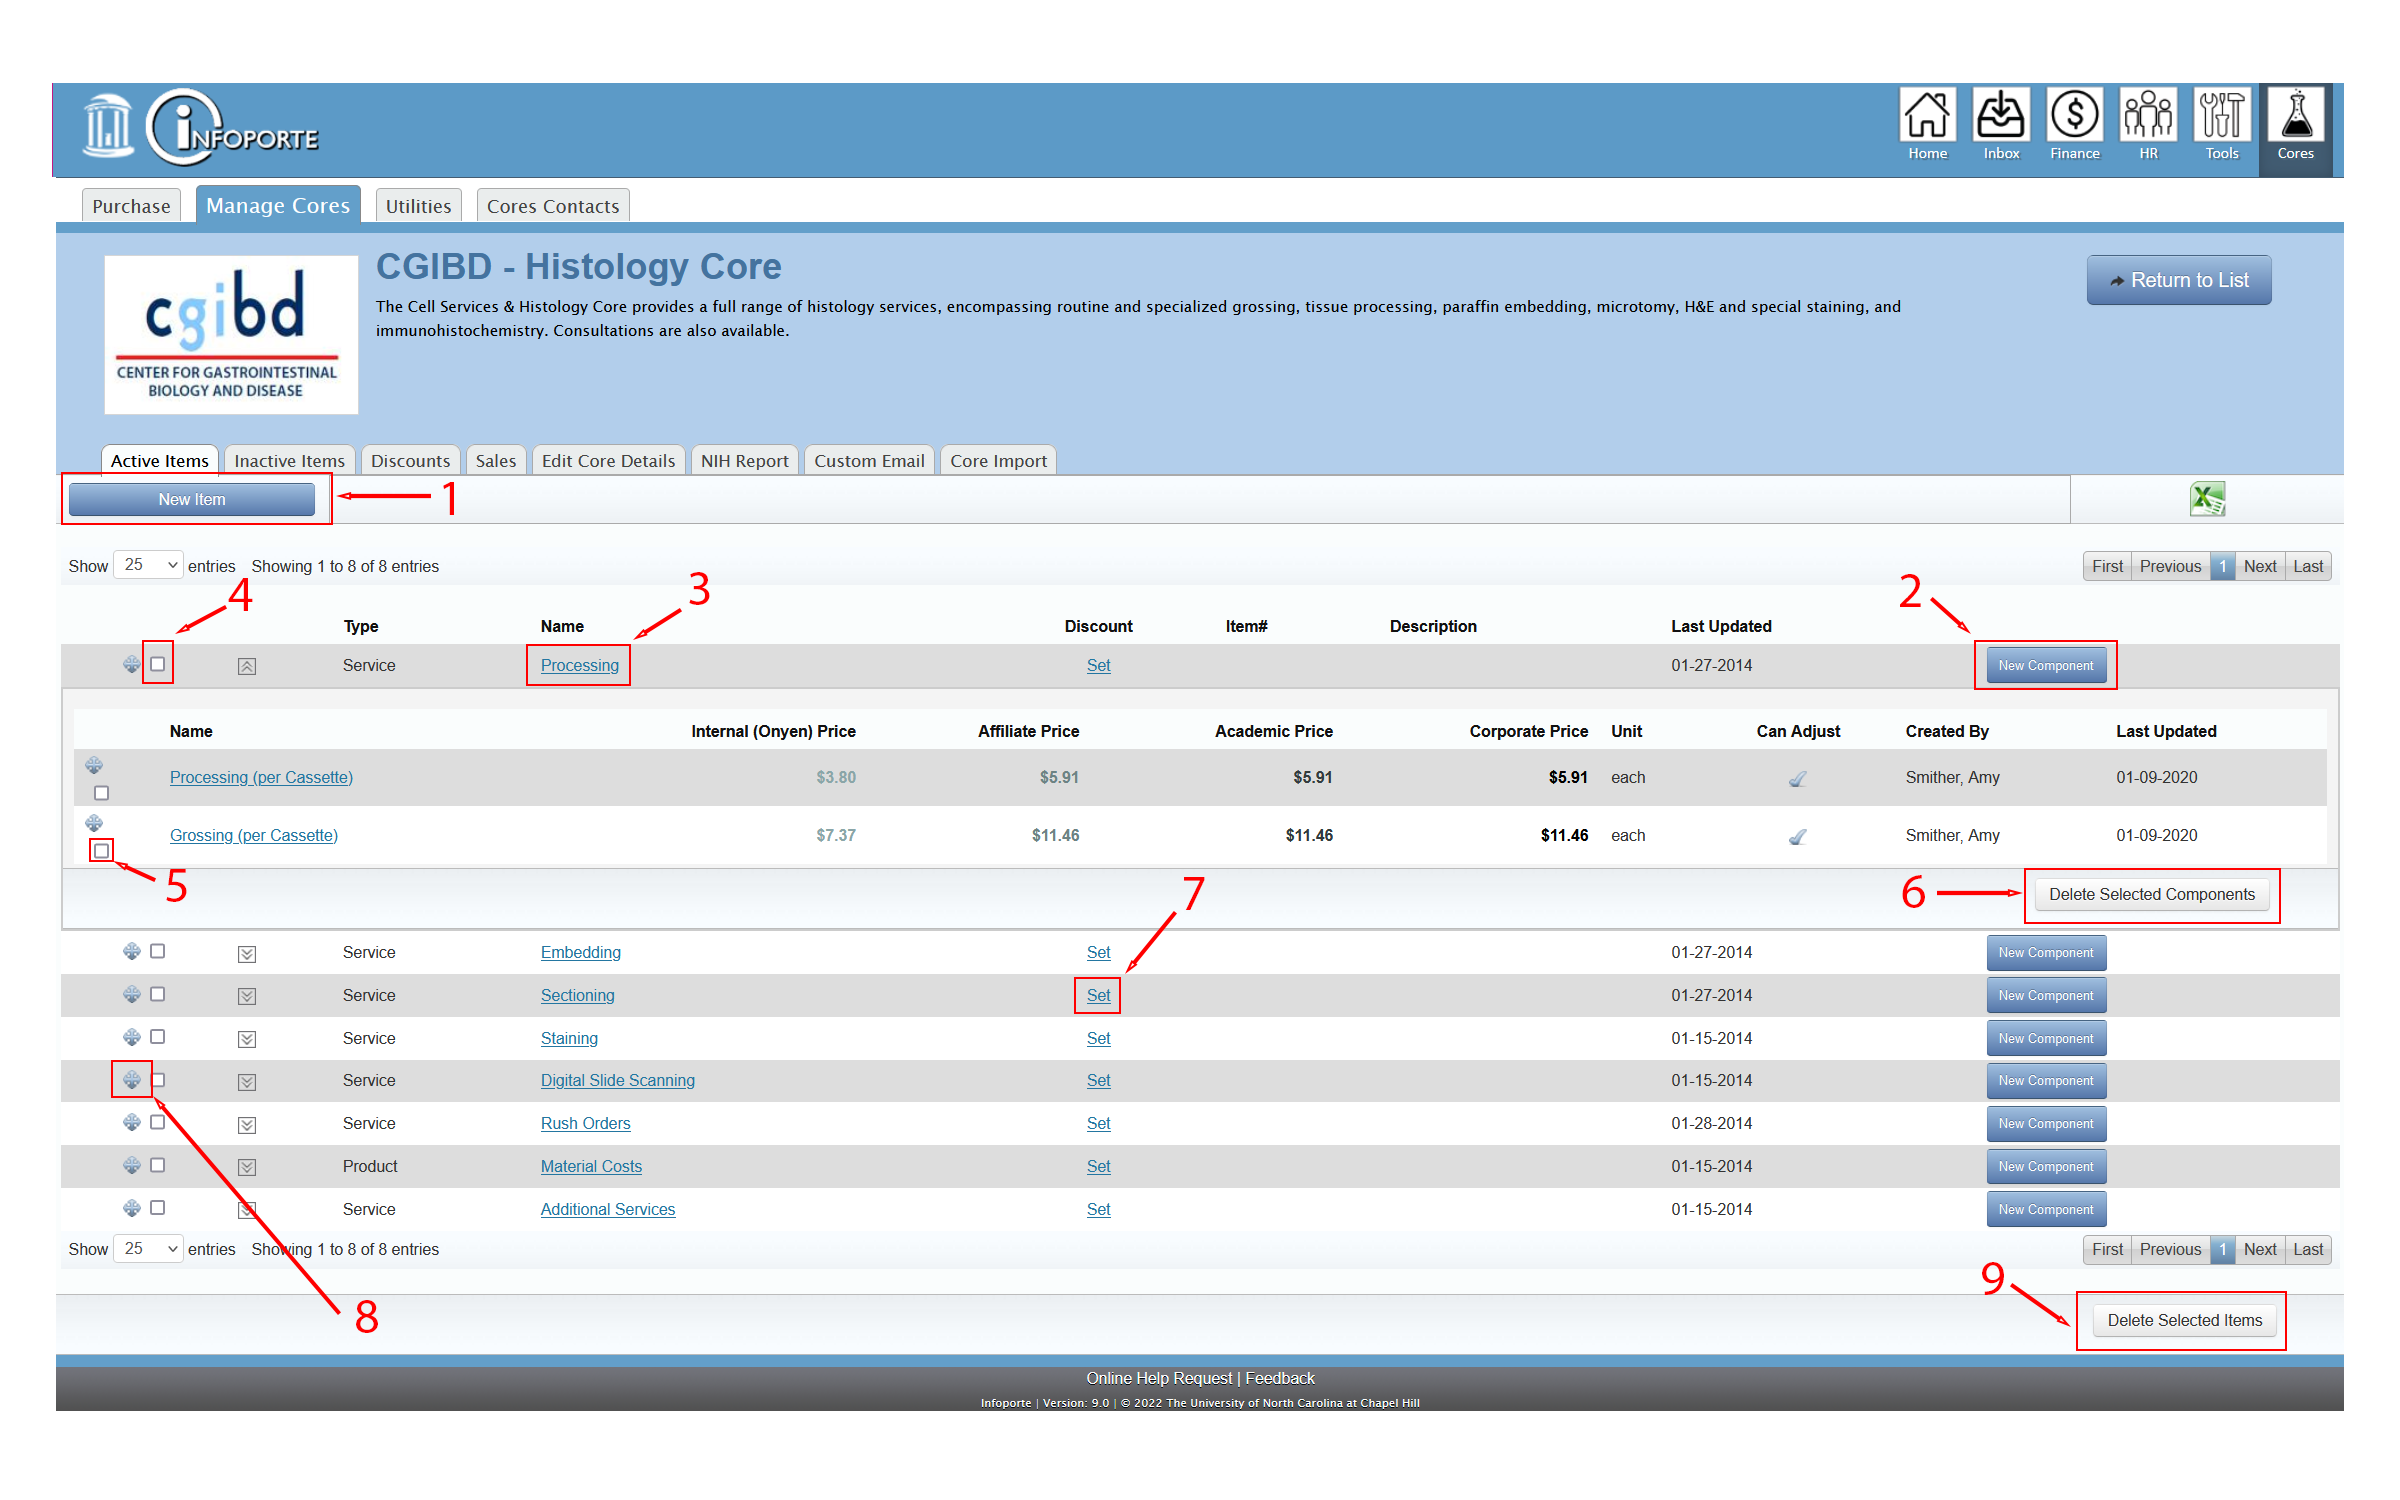
The Active Items screen lists all available items/services for sale for the core chosen.
To create a new item click on ‘New Item’ button. (#1 above).
To create a new component click on ‘New Component’ button. (#2 above). Note: Components are item specific.
To edit the item click on the item’s name (#3 above).
To remove the item, click on the item’s checkbox (#4 above) Once the desired items are selected, click on the ‘Delete Selected Items’ button (#9 above).
To remove a component, click on the component’s checkbox (#5 above). Once the desired components are selected, click on the ‘Delete Selected Components’ (#6 above).
To set a Discount on a component, click the words ‘Set’ next to the component (#7 above)
To move a component up and down on the list of components, click on the component’s move icon (the cross-hair icon #8 above) and move to the desired position. These changes are reflected immediately on the buy page.
Setting a Route for a Core

To sell items, a core must have a route set up. (Without a route, there would be no way to approve the sale). Once the core has a route, the core will be displayed in the available cores list.
To set up a route for a core, Click on Inbox, then Routes. If you do not have the Routes tab under Inbox then you are not authorized to set up routes, find someone who is or ask your ARC to do this for you.
If the route that you are setting up is new, click the New Route button (#1 above).
If you want to Edit a Route, enter the Department (#2 above) that the route is under and select Recharge as the category (#3 above) and click Search (#4 above). Click on the Route Name (#5 above) to select the route to edit it.
To Delete a route, click the checkbox next to the Route (#6 above) and click Delete Selected (#7 above).
Edit a Route
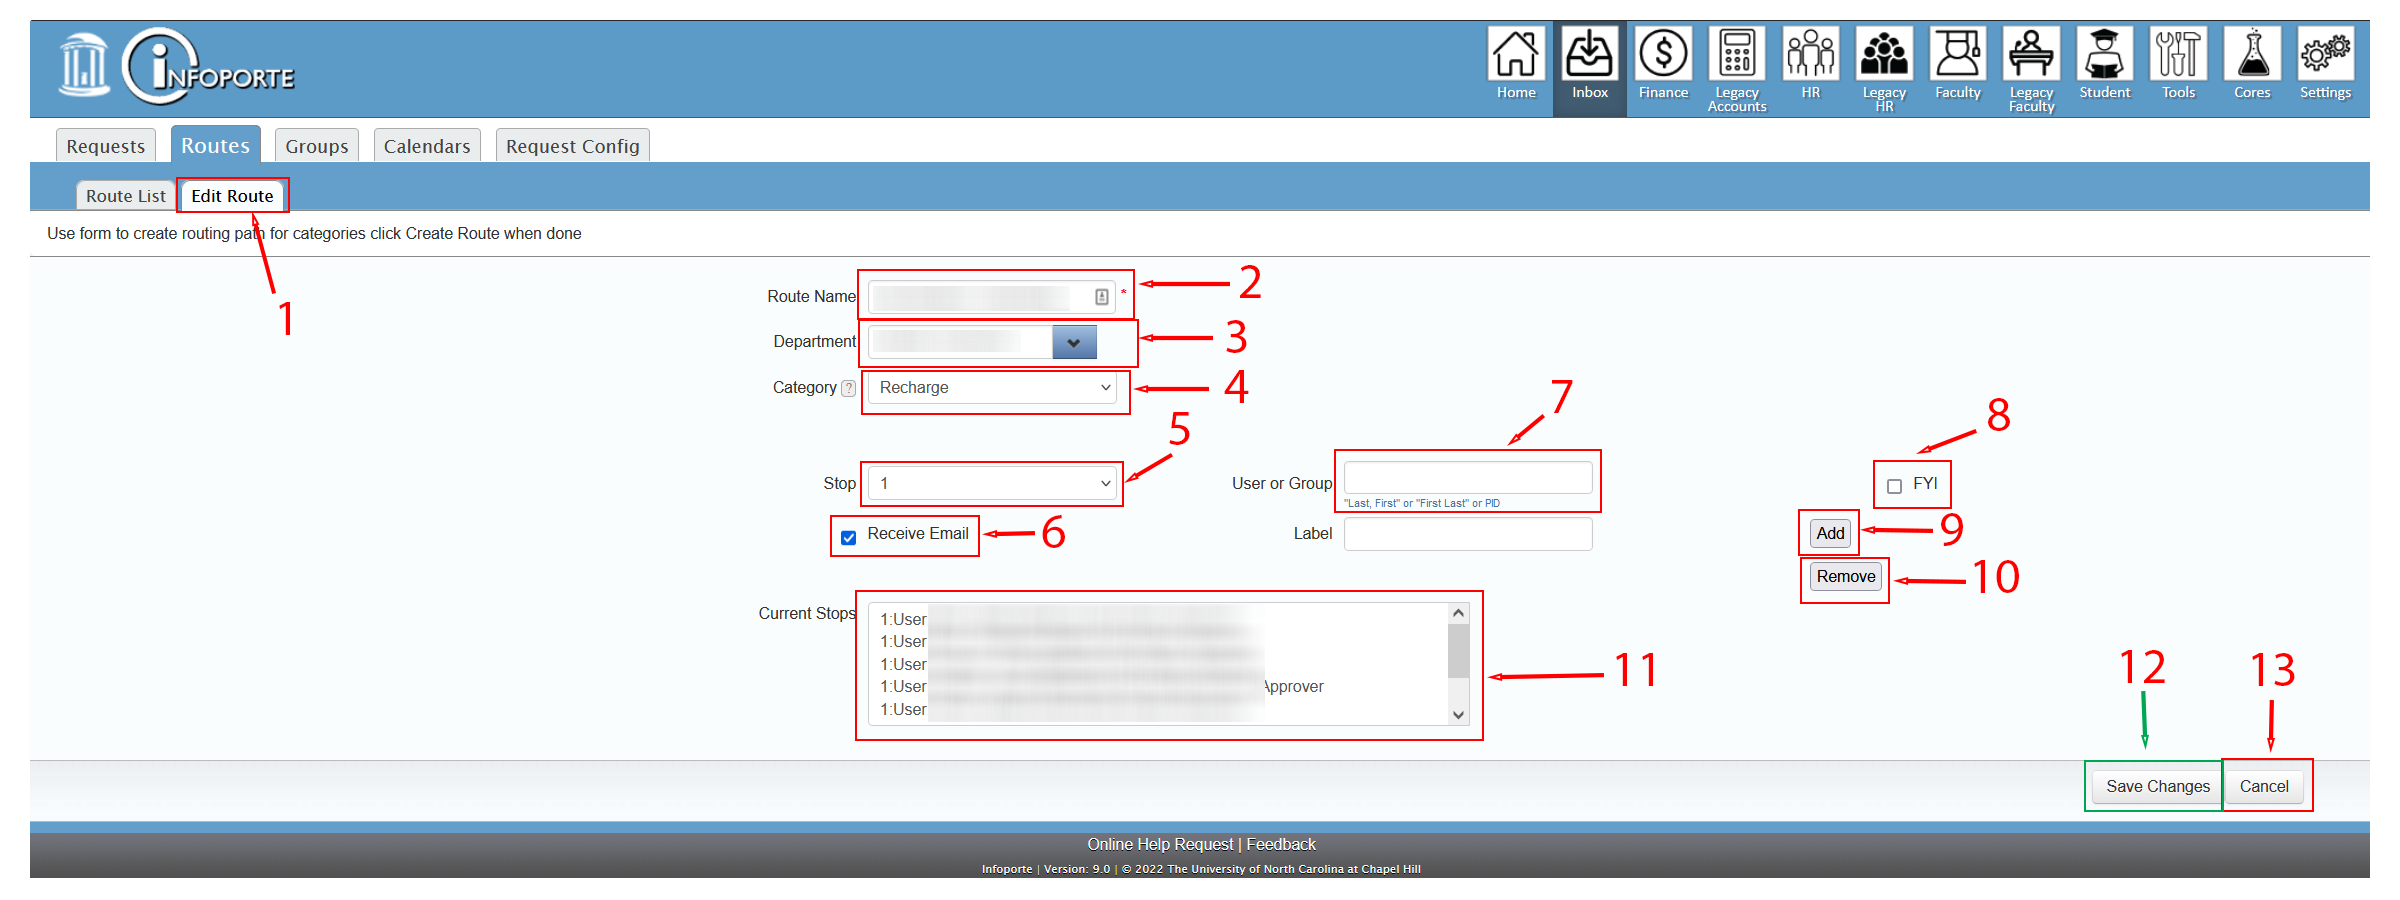
A route consists of a number of stops from 1 to 5 and a list of people who have approval or FYI access at each stop on the route. Every route must have at least one stop and the process for creating each stop is identical. Business practices of each Core determine how many approval stops an order goes through.
From Inbox > Routes select a route to edit it (#1 above).
Make sure that the Route name is correct (#2 above). You can change the name here if you would like to.
The Department (#3 above) must be exactly the same as the one in the Chartfield that was entered on the Edit Core Details page. This assures that the Route will be able to be selected when you are back on the Edit Core Details page.
Make sure that the Route Category (#4 above) is ‘Recharge’.
Start with Stop 1 (#5 above) and put in all approvers for that stop.
For each person selected to be on the current stop decide if they should receive an email notification when there is an order for them to approve. Check the checkbox (#6 above) if they should receive emails.
Enter one of the approver’s names or a group name in the User or Group field (#7 above). If the person is not an approver but should only be informed when an order has reached the current stop, then check the FYI checkbox (#8 above).
To add the user or group that you entered to the current stop of the route click the Add button (#9 above). The user will then show up in the Current Stops (#11 above) list of people.
If you would like to remove a person from a stop, select their name in the Current Stops (#11 above) and then click on the Remove button (#10 above).
We recommend that there be at least two people on each stop of a route. In case one person is out, then the other can approve the order.
Keep adding people to the current stop until all that should be on the stop have been added.
If another stop needs to be added to the route, then change the Stop (#5 above) and add people until you are satisfied.
After you have made all of your changes and additions to your Core’s route, make sure to click the Save Changes button (#12 above).
Or if you don’t want to make updates to the route, click the Cancel button (#13 above).
Inactive Items

The Inactive Items screen lists all available items/services NOT for sale for the core chosen.
To change the status of the item, click on the item’s name (#1 above), check the active checkbox, and save the changes. see Editing an Item for more information.
To remove the item, click on the item’s checkbox (#2 above). Once the desired items are selected, click on the ‘Delete Selected Items’ button(#5 above).
To remove a component, click on the component’s checkbox (#4 above). Once the desired components are selected, click on the ‘Delete Selected Components’ (#5 above).
Creating a New Item

The New Item screen enables you to create items. To create an item, fill out the required fields (* above) and click on the ‘Create Type’ button (#2 above).
Checking the active checkbox (#1 above) will enable the item, allowing it to be available to sell. If unchecked, the item will appear in the Inactive Items listing.
If components under this item need to have options associated with them, add Custom Fields as needed. Custom Fields can be a selectable list of options or an editable text field.
Remember to check the ‘Return to List’ checkbox, or the page will reload and allow you to adjust your item. See Editing Items for more information.
Choosing ‘Cancel’ (#3 above) will return you to the Active Items page
Editing an Item
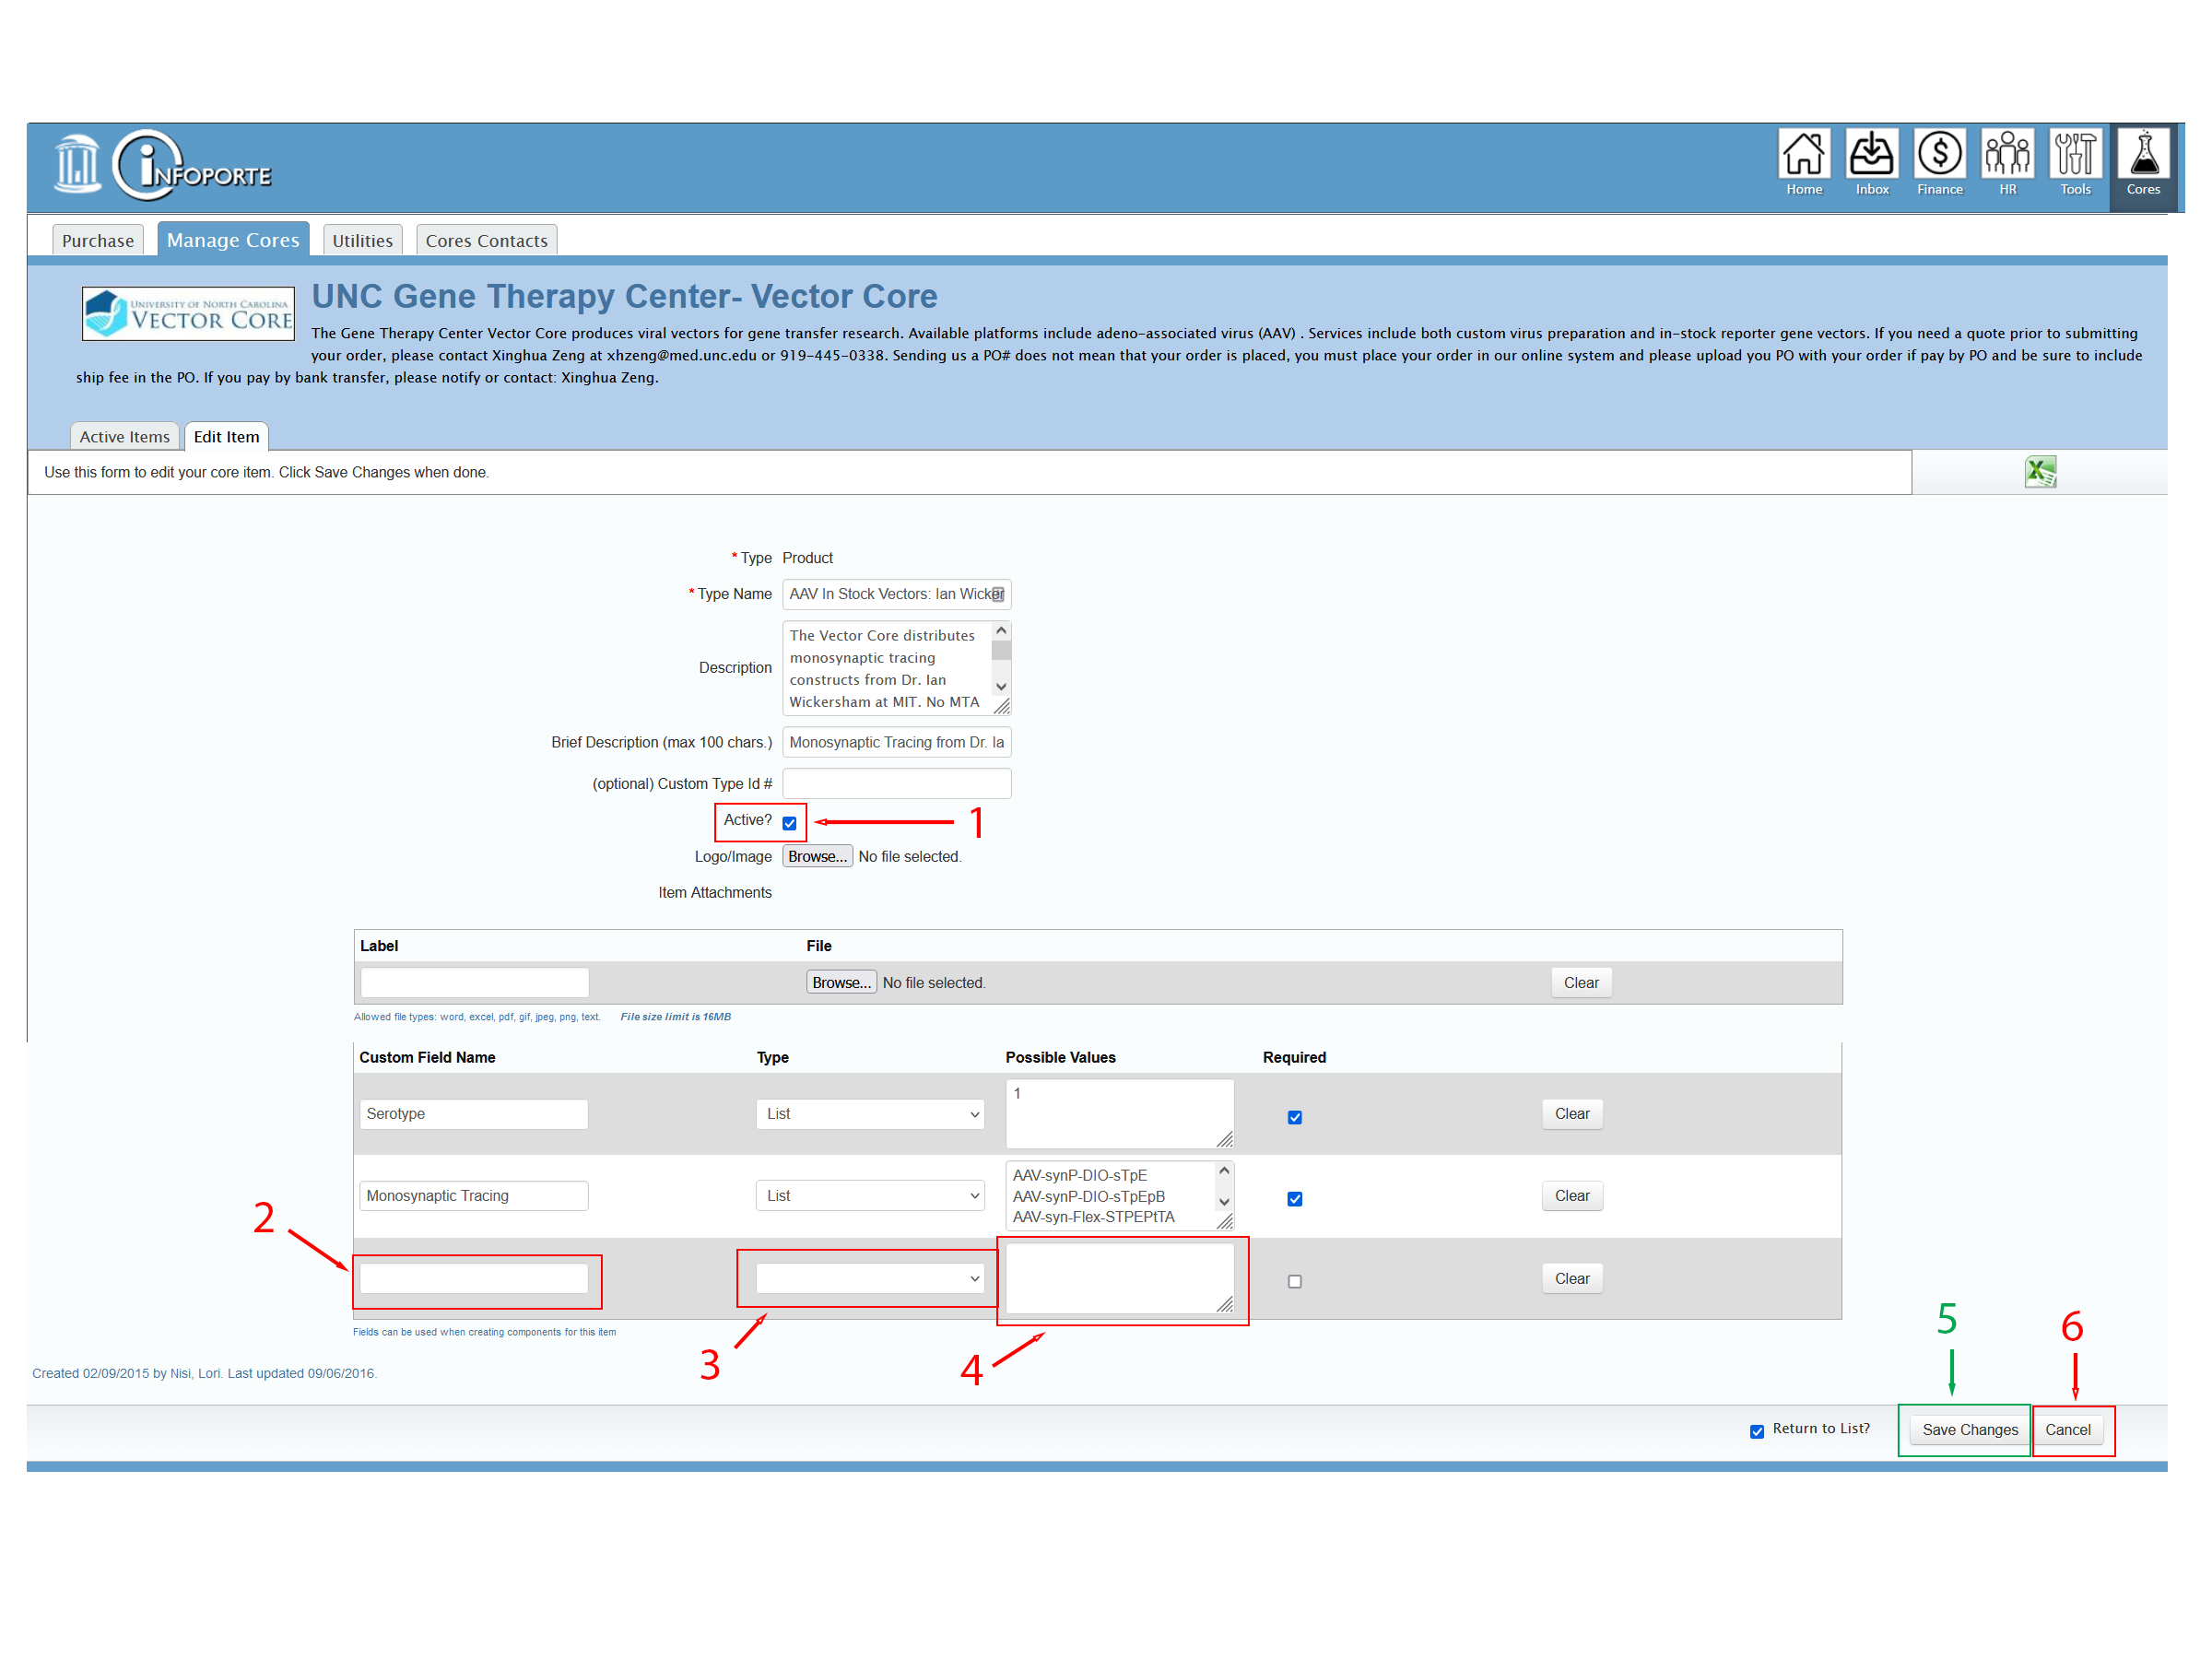
The Edit Item screen enables you to edit items. To edit an item, simply add/edit your information and click on the ‘Save Changes’ button (#5 above). Make sure that all required fields (* above) contain data.
Checking the active checkbox (#1 above) will enable the item, allowing it to be available to sell. If unchecked, the item will appear in the Inactive Items listing.
To add options to the Components under this item update the list of Custom Fields by naming a Custom Field (#2 above), selecting a Custom Field Type (Text or List #3 above). If the Custom Field Type is List, enter options, one per line in Possible Values (#4 above).
Remember to check the ‘Return to List’ checkbox, or the page will reload and allow you to adjust your item.
Choosing ‘Cancel’ (#6 above) will return you to the Active Items page
Creating a New Component
Creating a New Component (Services & Products)
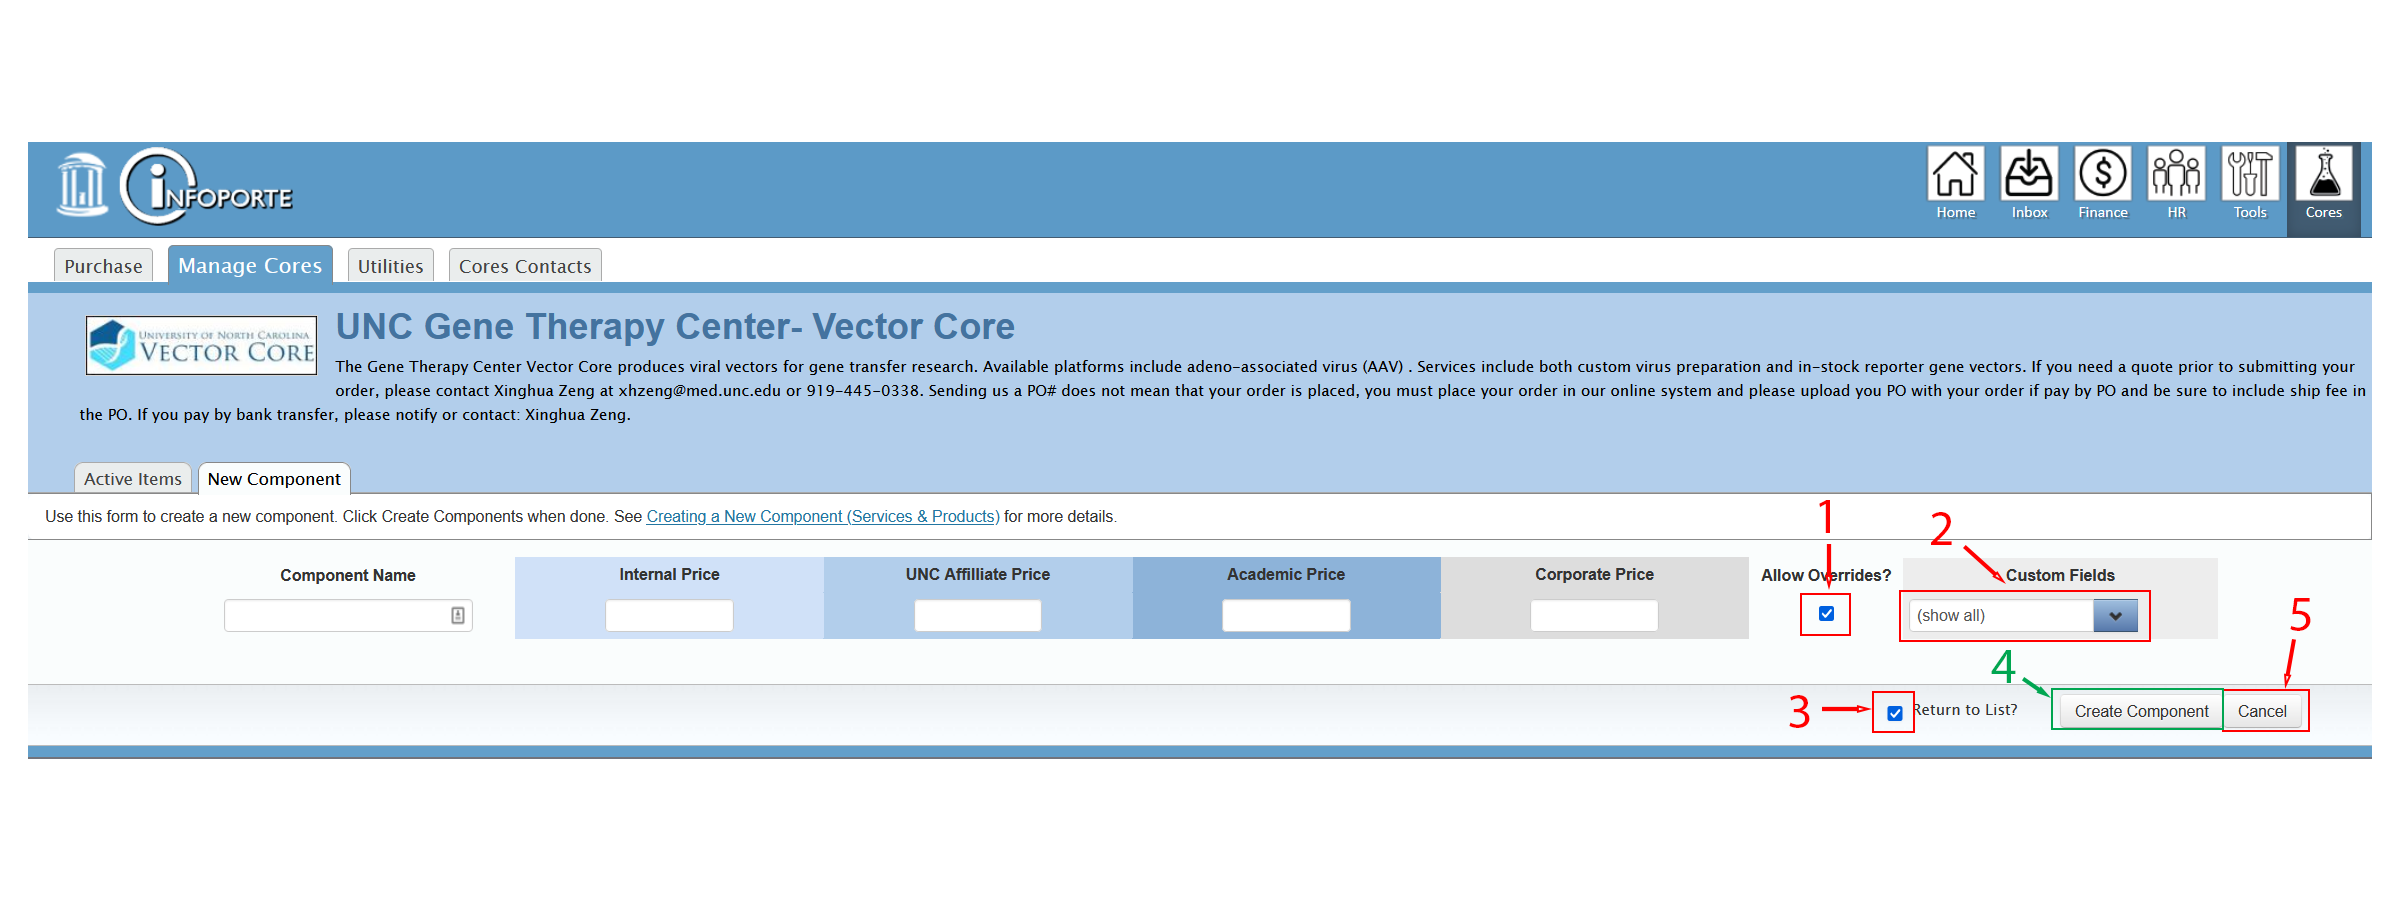
The Add Component Item screen enables you to create components. To create a component, add a component name, price and click on the ‘Create Components’ button (#4 above). Note: Once a name is added, the price fields become required.
Checking the Allow Overrides checkbox (#1 above) will enable price/quanitity overides.
To add option fields to the component select the ones that have been defined in Create/Edit Items from the Custom Fields dropdown (#2 above).
Remember to check the ‘Return to List’ checkbox (#3 above), or the page will reload and allow you to create more components.
Choosing ‘Cancel’ (#5 above) will return you to the Active Items page
Creating a New Component (Timeshares)
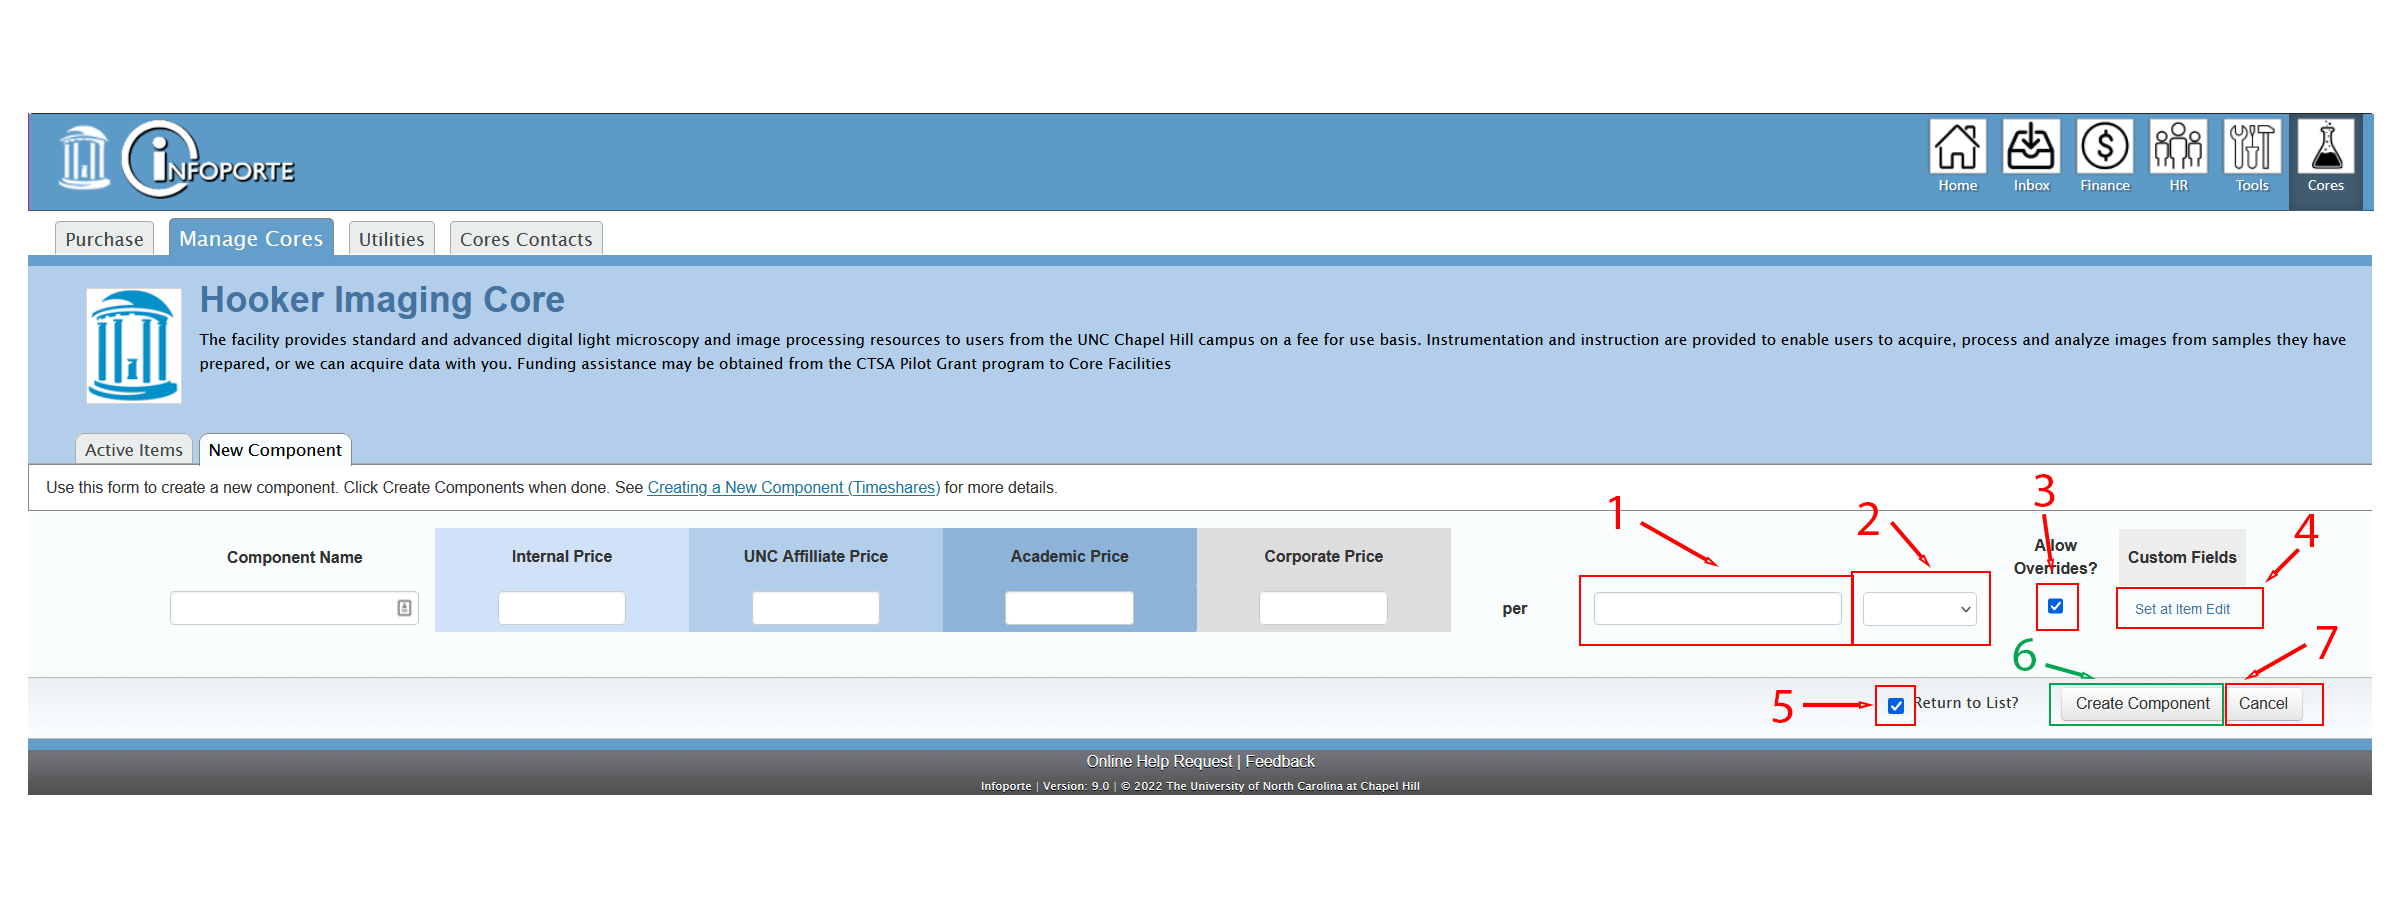
The Add Component Item screen enables you to create components. To create a component, add a component name, price and click on the ‘Create Components’ button (#6 above). Note: Once a name is added, the price fields become required.
Timeshares require a rate. Add your numeric rate (#1 above) and unit (#2 above).
Checking the Allow Overrides checkbox (#3 above) will enable price/quanitity overides.
If this timeshare has options enter the option on the Item Edit page that this component belongs to (#4 above).
Remember to check the ‘Return to List’ checkbox (#5 above), or the page will reload and allow you to create more components.
Choosing ‘Cancel’ (#7 above) will return you to the Active Items page
Discounts

The Discounts screen allows you to set discount and lists all available discounts and groups associated with those discounts.
To create a discount a group must exist first. If your core has no groups set yet, click #2 above to create one.
To create a new discount click the New Discount button (#1 above).
Create Discount Group

The Create Group screen enables you to create discount groups. Discount groups are required to create discounts. To create a discount group, enter the Group Name and Department and click on the Update button (#3 above).

To add an employee, type a name or PID into the Name box (#1 above). When you select an employee from the autocomplete list, the fields below (name, PID, etc) will be automatically populated. On rare occasions an employee may not be found by the lookup service, or the employee may be found but lack an onyen. If this occurs, you can still create the user if he/she has a valid PID and onyen by manually providing the missing fields.
To Add the employee that you found click the Add>> link (#2 above).
If you have added an employee in error use the Delete<< link to remove them from the Group.
Choosing ‘Cancel’ (#5 above) will return you to the Discount listings page.
Edit Discount Group
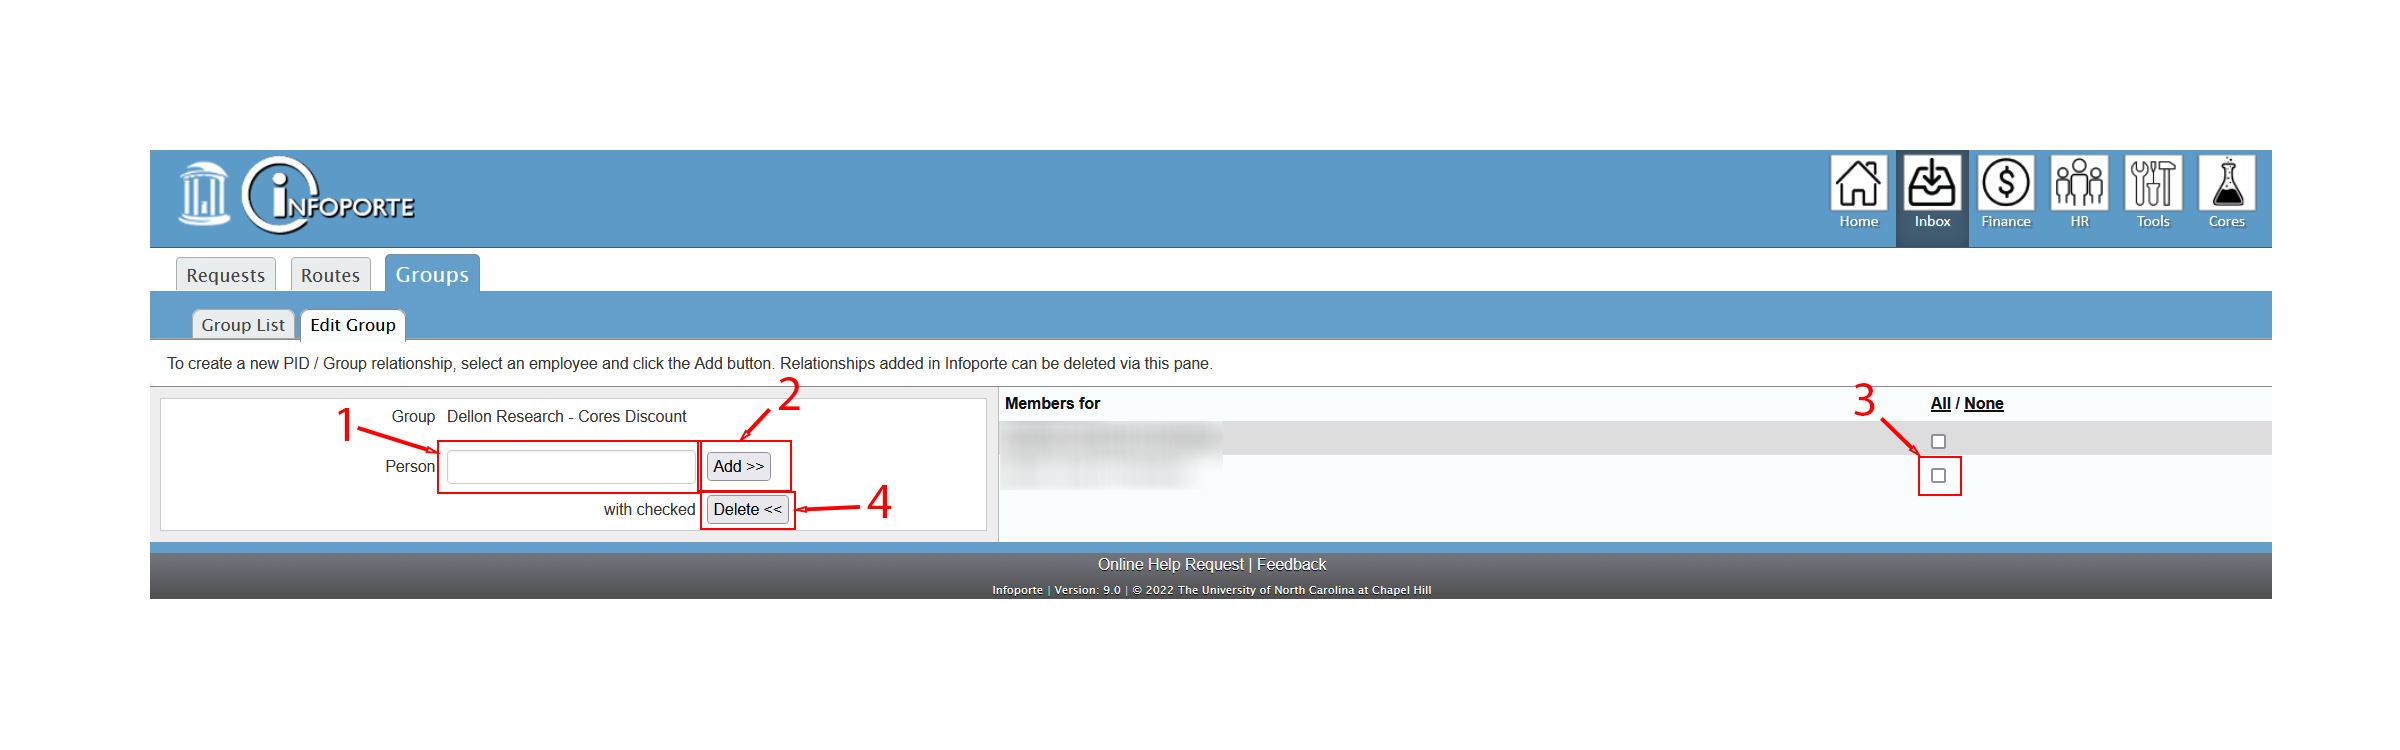
The Edit Group screen enables you to add additional people to discount groups. To add an employee, type a name or PID into the empty Person box (#1 above). When you select an employee from the autocomplete list, the fields below (name, PID, etc) will be automatically populated. On rare occasions an employee may not be found by the lookup service, or the employee may be found but lack an onyen. If this occurs, you can still create the user if he/she has a valid PID and onyen by manually providing the missing fields. Click on the ‘Add>>’ button (#2 above) to add the person the the group.
To remove a person from the group click on the selection box (#4 above) and the ‘Delete<<’ button (#4 above).
Sales Report
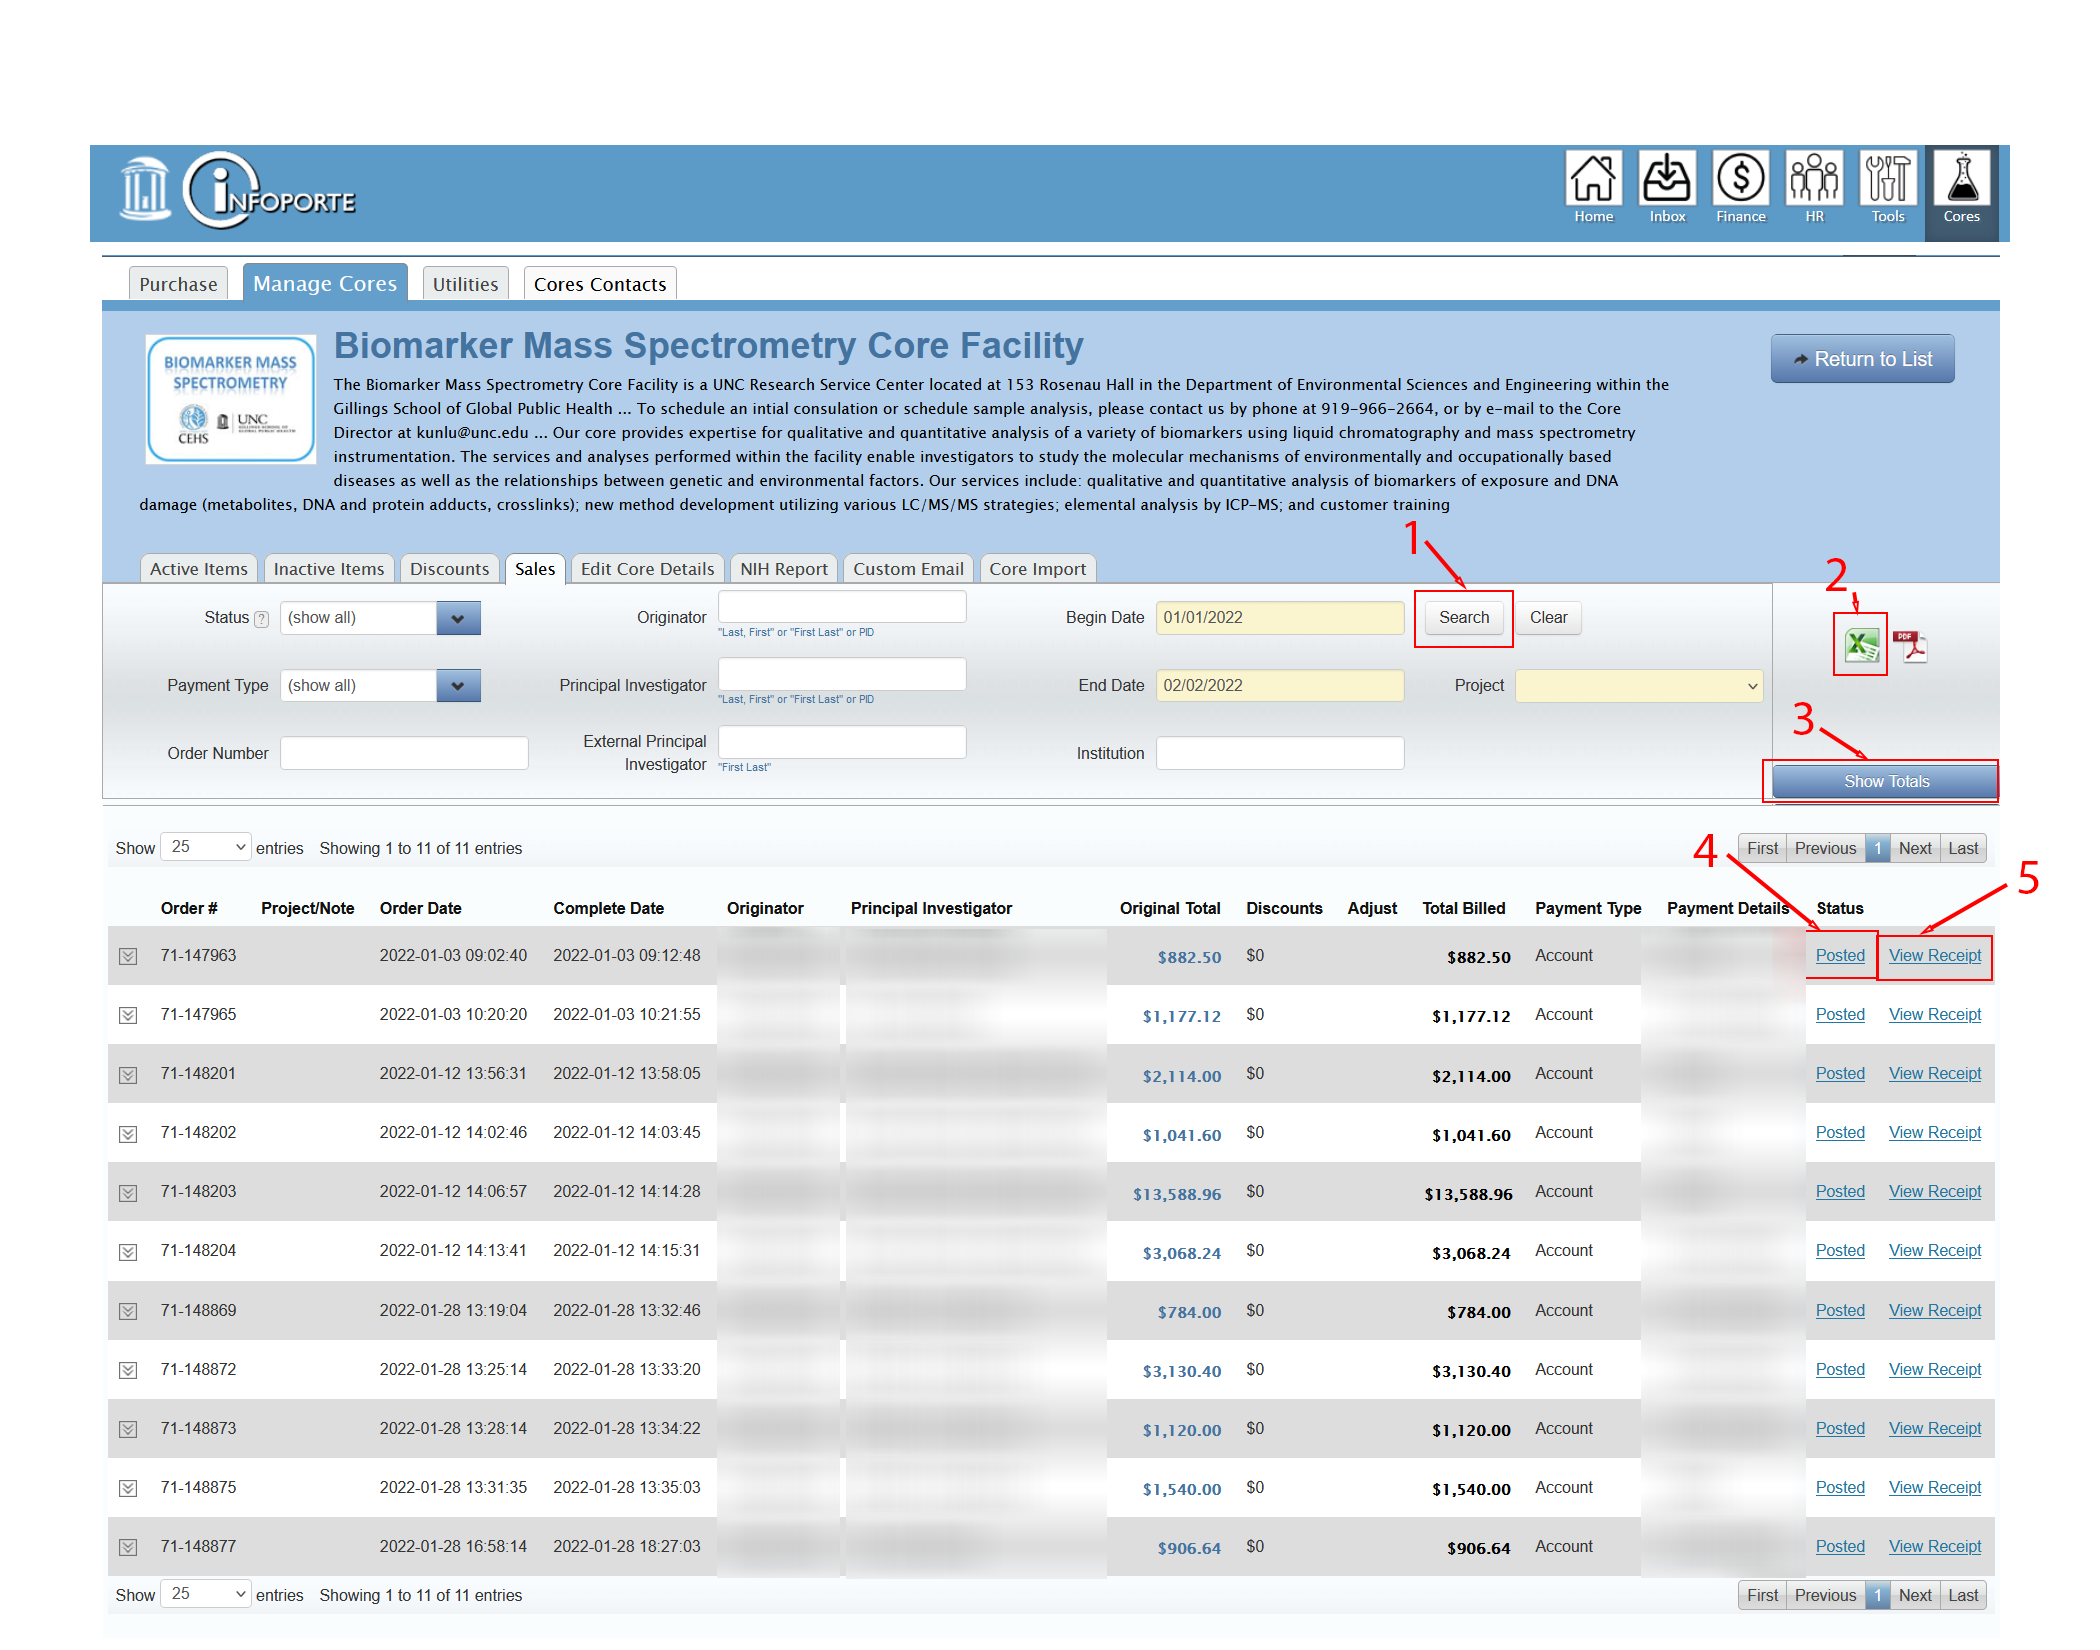
The Sales Report screen lists all recent sales
This listing will display the status of the Sales for your Core. and allow you to view the Receipt for each order. by clicking the ‘View Receipt’ button (#5 above, See Receipt)
The top of the page allows you to refine the search for orders by Status, Originator, Date, Payment Type, Principal Investigator, ProjectID, Order Number, External PI, or Institution. Click Search (#1 above) to apply your search criteria to find orders that match your selections.
To get an Excel or PDF version of the report click the appropriate icon (#2 above).
You can see totals for the report by clicking the Show Totals button (#3 above).
Each order displays its current status (#4 above), which will take you to the Infoporte Inbox to view the order’s Request, and allow you to view the Receipt for each order. by clicking the ‘View Receipt’ button (#5 above, See Receipt).
Consolidated Sales Report
The Consolidated Sales Reports lists sales for more than one Core.
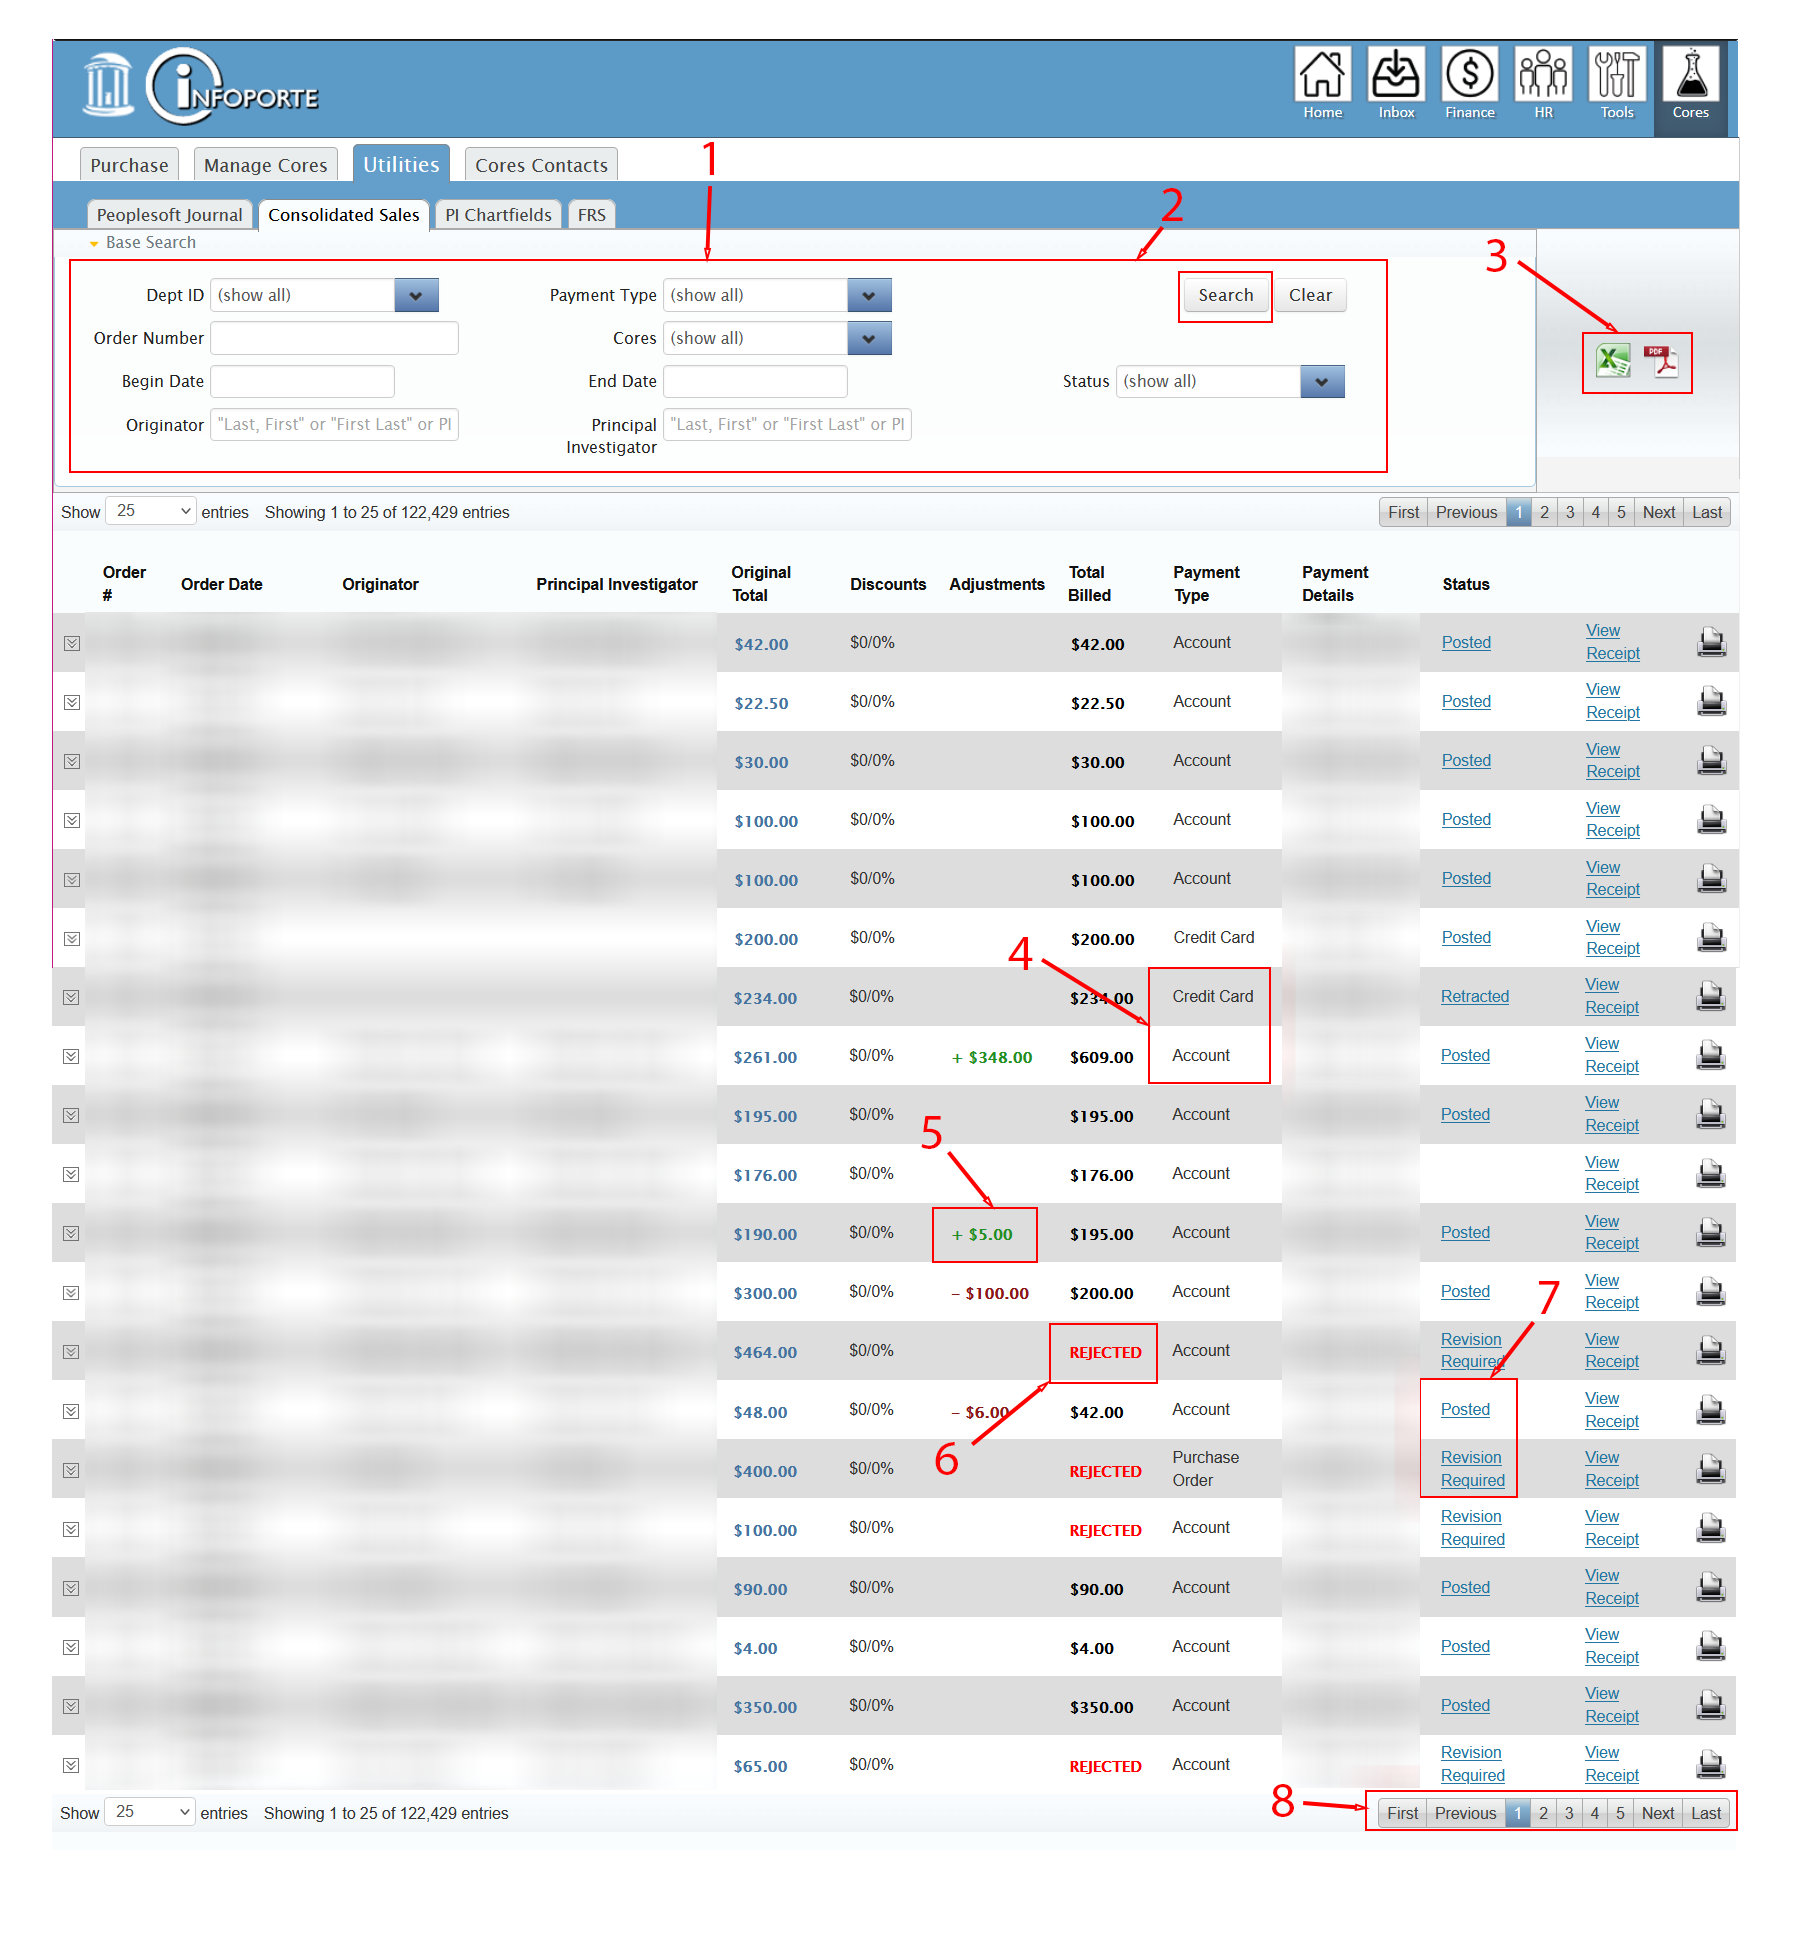
To refine the Consolidated Sales report use the search criteria for Department, Payment Type, Order Number, Core(s), Begin and End Dates, Status, Originator, and PI (#1 above). Click Search to get orders that meet your criteria (#2 above).
To get an Excel or PDF version of the report click on the proper icon for a file to be downloaded (#3 above).
A few items to note on the Consolidated Sales report are the payment type (#4 above), adjustments made (#5 above), ‘Rejected’ as a total if the order was canceled (#6 above), and the current order status (#7 above).
Move from page to page of the report by clicking on the report page navigation (#8 above).
NIH Report
The NIH Report is similar to the Sales Report and Consolidated Sales report but also includes account information.
This report has many columns so it spans two screens wide. The left side of the page:

A core or multiple cores can be selected (#1 above), as well as Begin and End Dates (#2 and #3 above). When the page first loads only the most recent orders are shown. Change the dates to see more orders.
Click Search (#4 above) when you are happy with your Core and Date selections.
The “Account Info >” button (#5 above) gets you to the right side of the report with all of the Account information on it (see next screen image below).
If you want the data in Excel format click the Excel icon (#6 above) to download the data.
The columns on the left side of the report are similar to those on the Sales Report with the exception of each component that was on the order is listed under the order total line (#7 and #8 above).
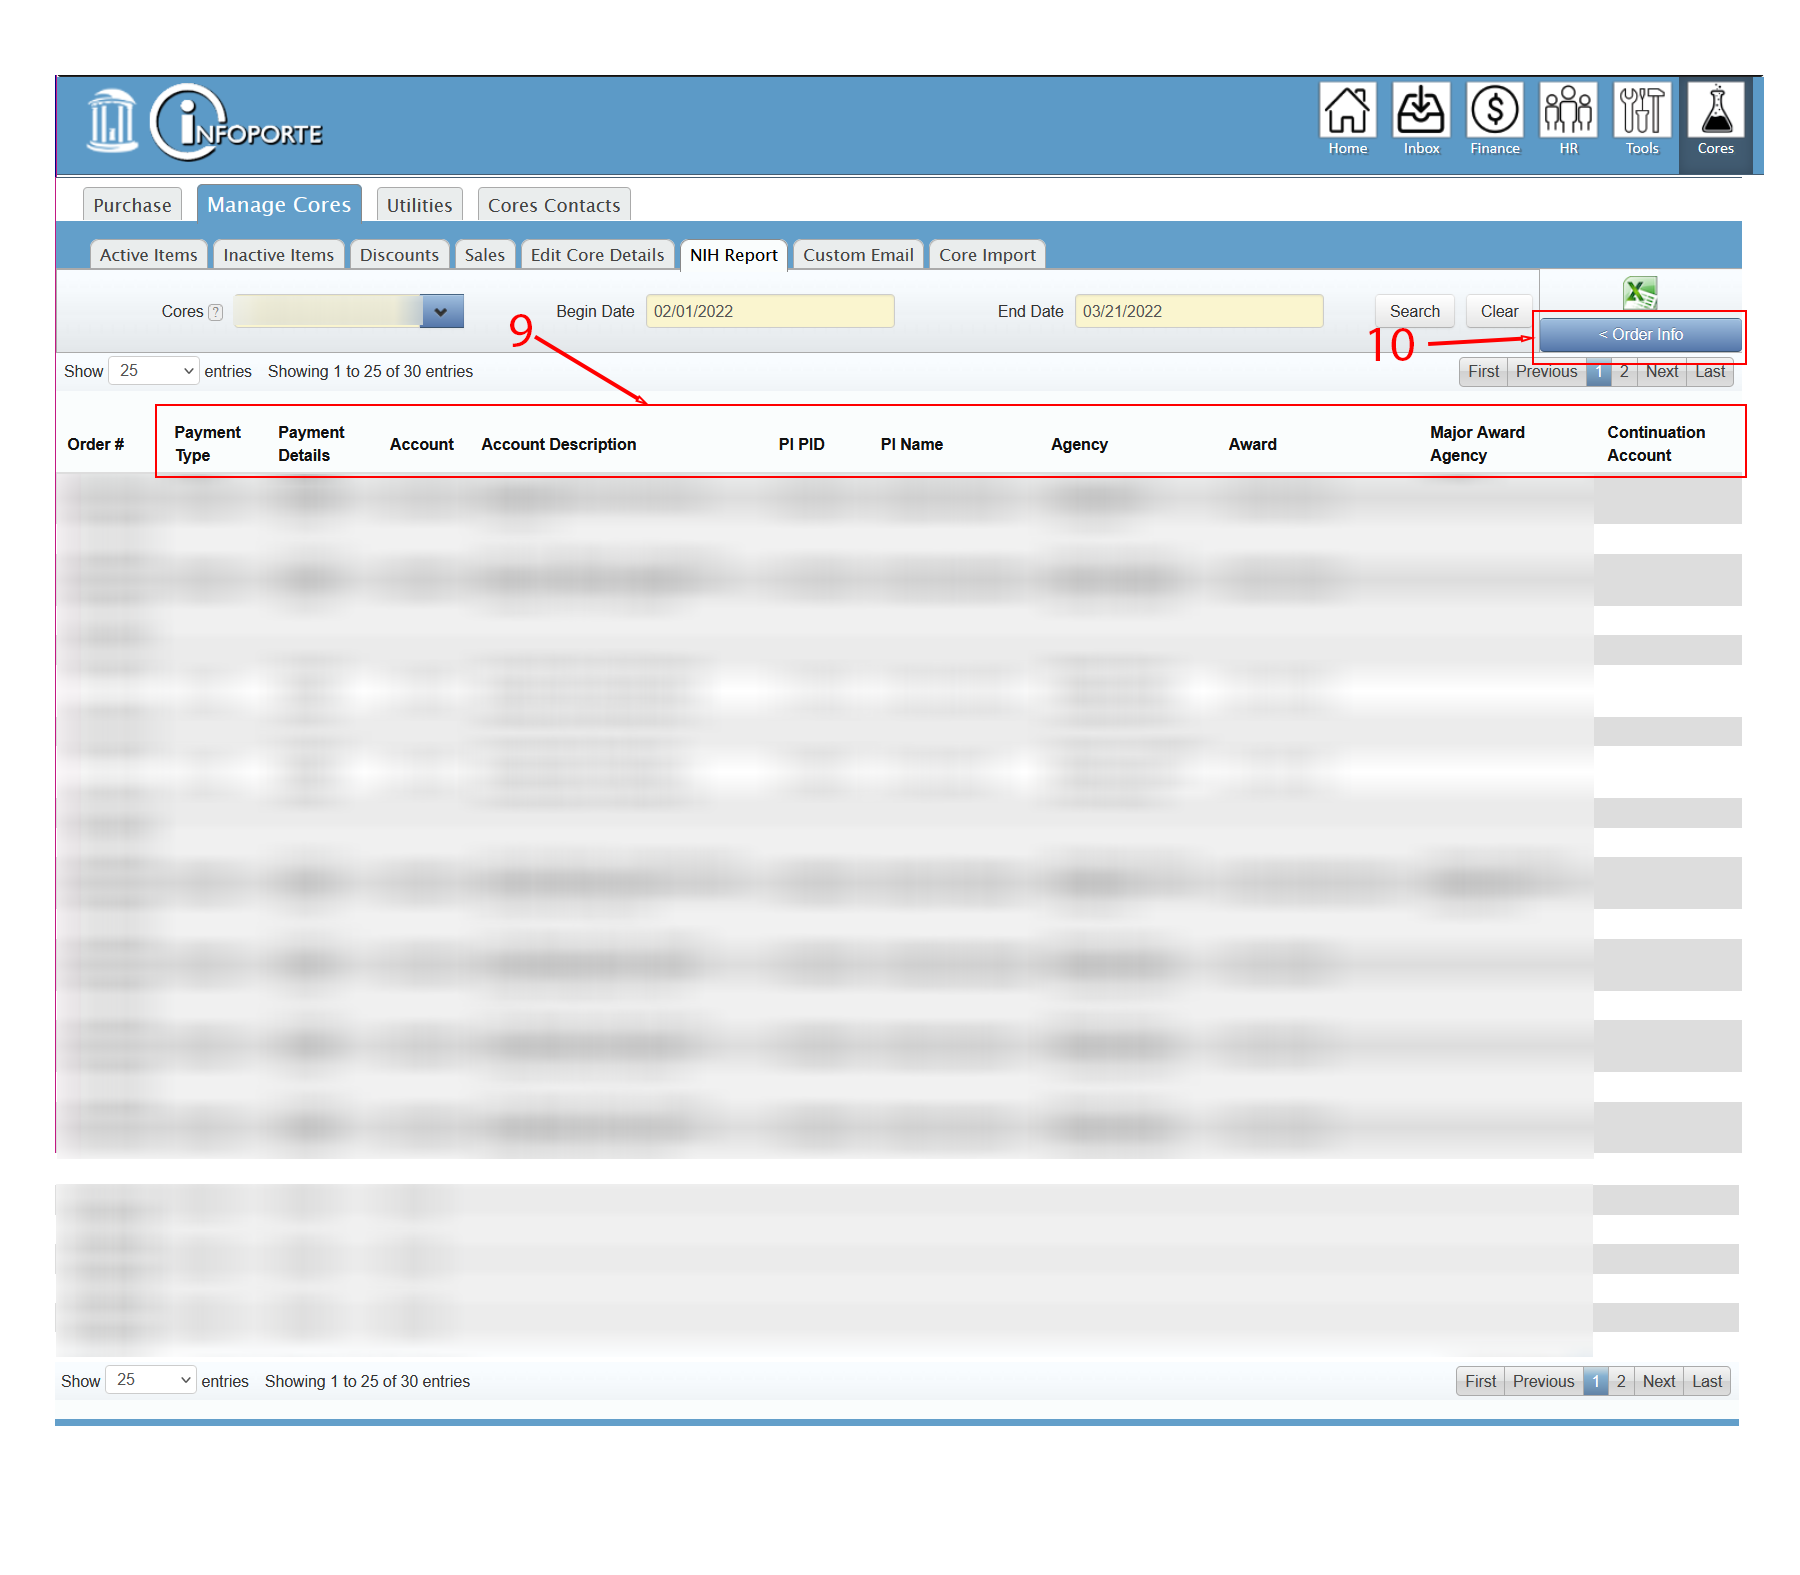 The right side of the NIH Report contains Account related information (#9 above).
To see the left side – the part of the report that you see first, click the “<Order Info” button (#10 above).
Core Report Dashboard
The Core Report Dashboard is an interactive report that lets you select many search criteria to explore one or more Cores.
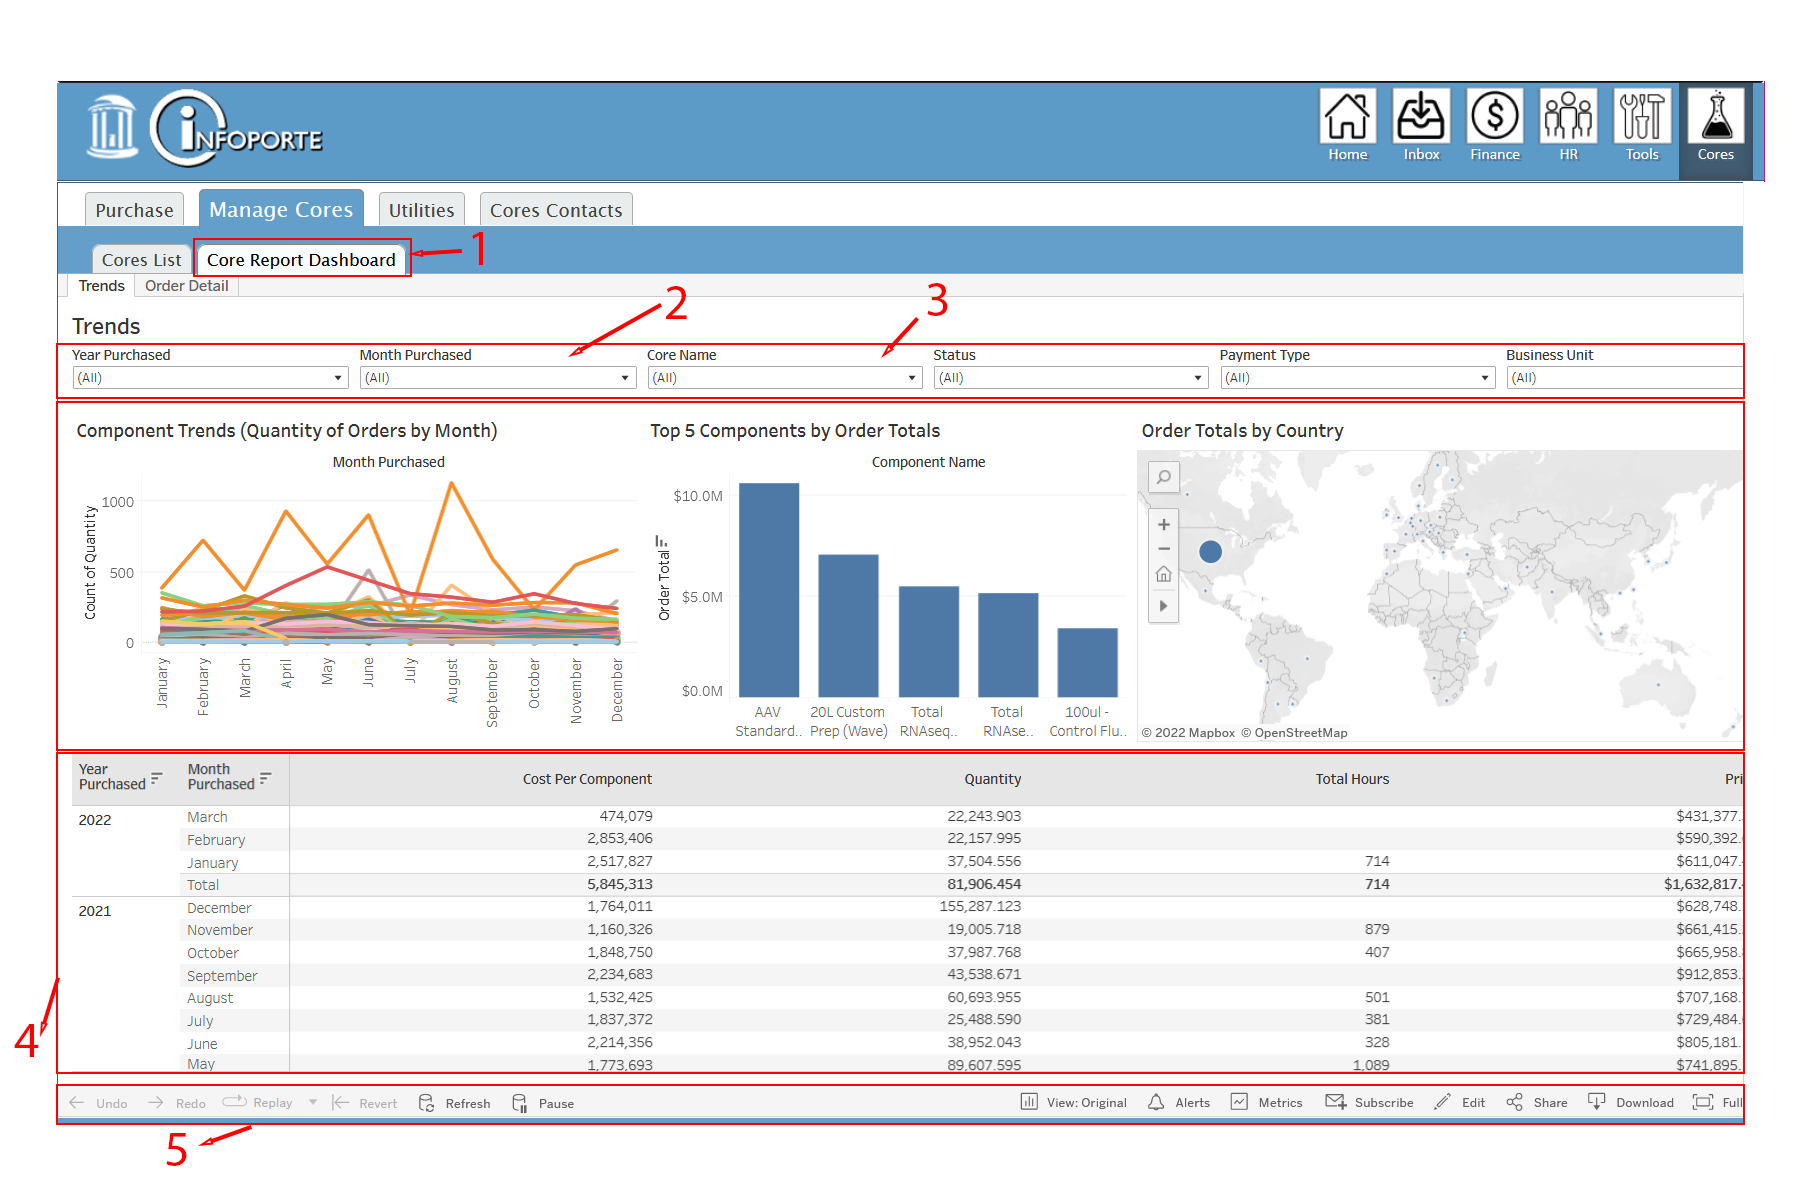
The Core Report Dashboard can be found under Manage Cores, to the right of the Cores List (#1 above).
This is a tableau report, so you must login to Tableau before any data can be displayed.
After signing into Tableau you will be presented with the default Trends report that lists All of everything for all time. To refine the report to what you are interested in, use the Trends selectors at the top of the page (#2 above). As you change the criteria you the data below will change.
The graphs (#3 above) and detailed data (#4 above) show the data that you selected in #2.
All the data displayed can be further manipulated and downloaded using the Tableau tool bar (#5 above).
The Order Details tab changes the screen to display only order details, no graphs.
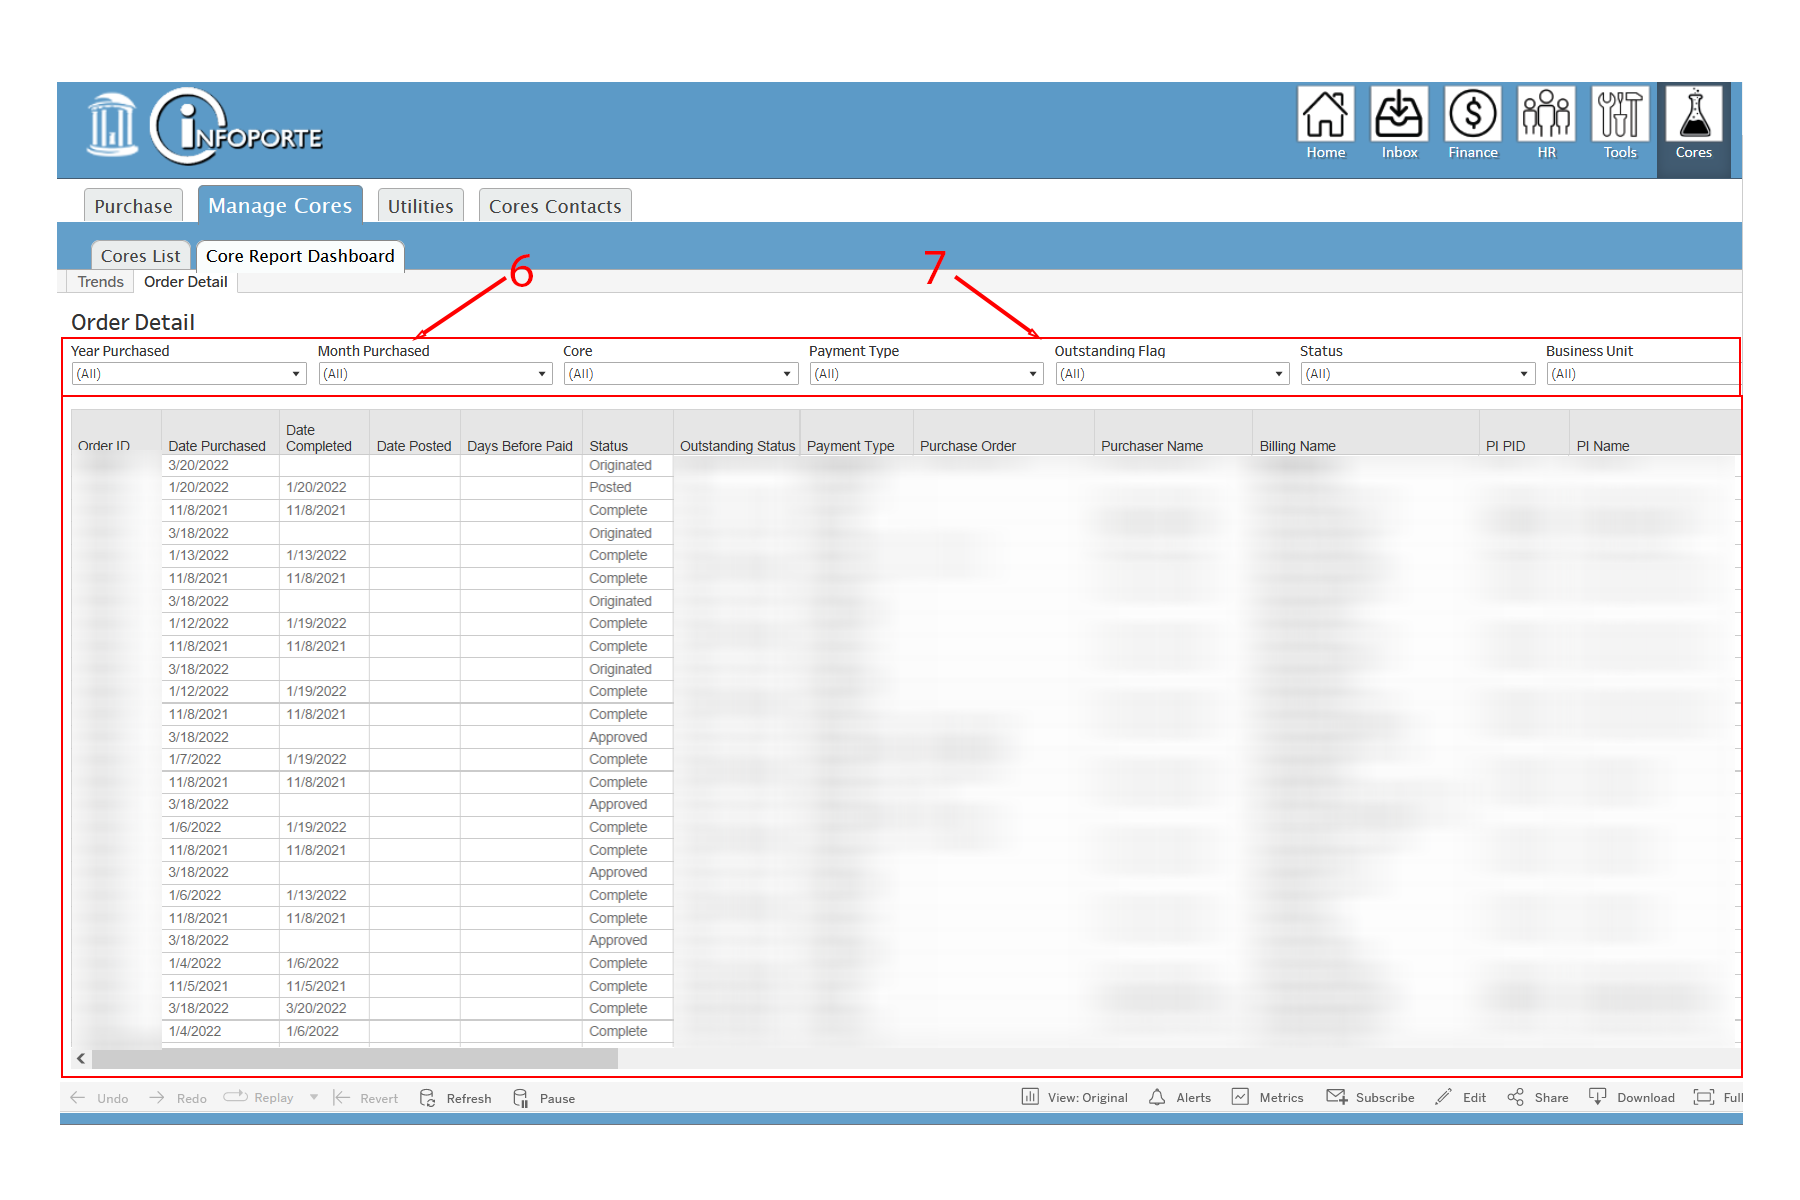
The Order Detail page is the second page of the Core Report Dashboard Tableau report.
It shows the Order Details (#7 above) using the data selection criteria (#6 above) that you can change and watch the data change on the fly.
There are standard emails that Cores sends out to customers and cores at different times of an order’s life cycle. These standard emails can be customized to some extent by each Core that wishes to put a more core-centric message in with the emails.
 The Custom Email tab is under the Manage Cores tab.
First, select the Email Type that you would like to change (#1 above). Your choices are:
- new order
- adjusted order
- completed order
- rejected order
- payment overdue
- new order account
- new order purchase order
- new order credit card
- completed order account
- completed order purchase order
- completed order credit card
- timeshare reminder
The text for the default email appears in each editable space and also on the sample email that is on the right side of the page.
When you want to put Order Specific information in your text, you can use the following (please type them exactly as shown) that will be filled in with the actual values:
- [ORDER_NUMBER] for order number
- [BILLING_NAME] for Core billing contact
- [COMMENTS] for order adjustment comments
The Subject of the email (#2 above) can be changed as you like, and as you change it the text at the top of the sample email will change, as will anything that you can change on the left side of the page.
The body of the email can be changed as you like in “Your Custom Email Text” (#3 above).
There is always a link included in the email. If you would like to change the standard text you can do that in the Link Text area. (#4 above).
If you would like a special footer message on your Core’s emails then include it in the option Footer Text area (#5 above). The email sample above has no footer text, which is the default.
The monthly feed process for internal order leaves behind a log of the orders that were processed. If you have access to view this data it can be seen under the Peoplesoft Journal tab (#1 below).
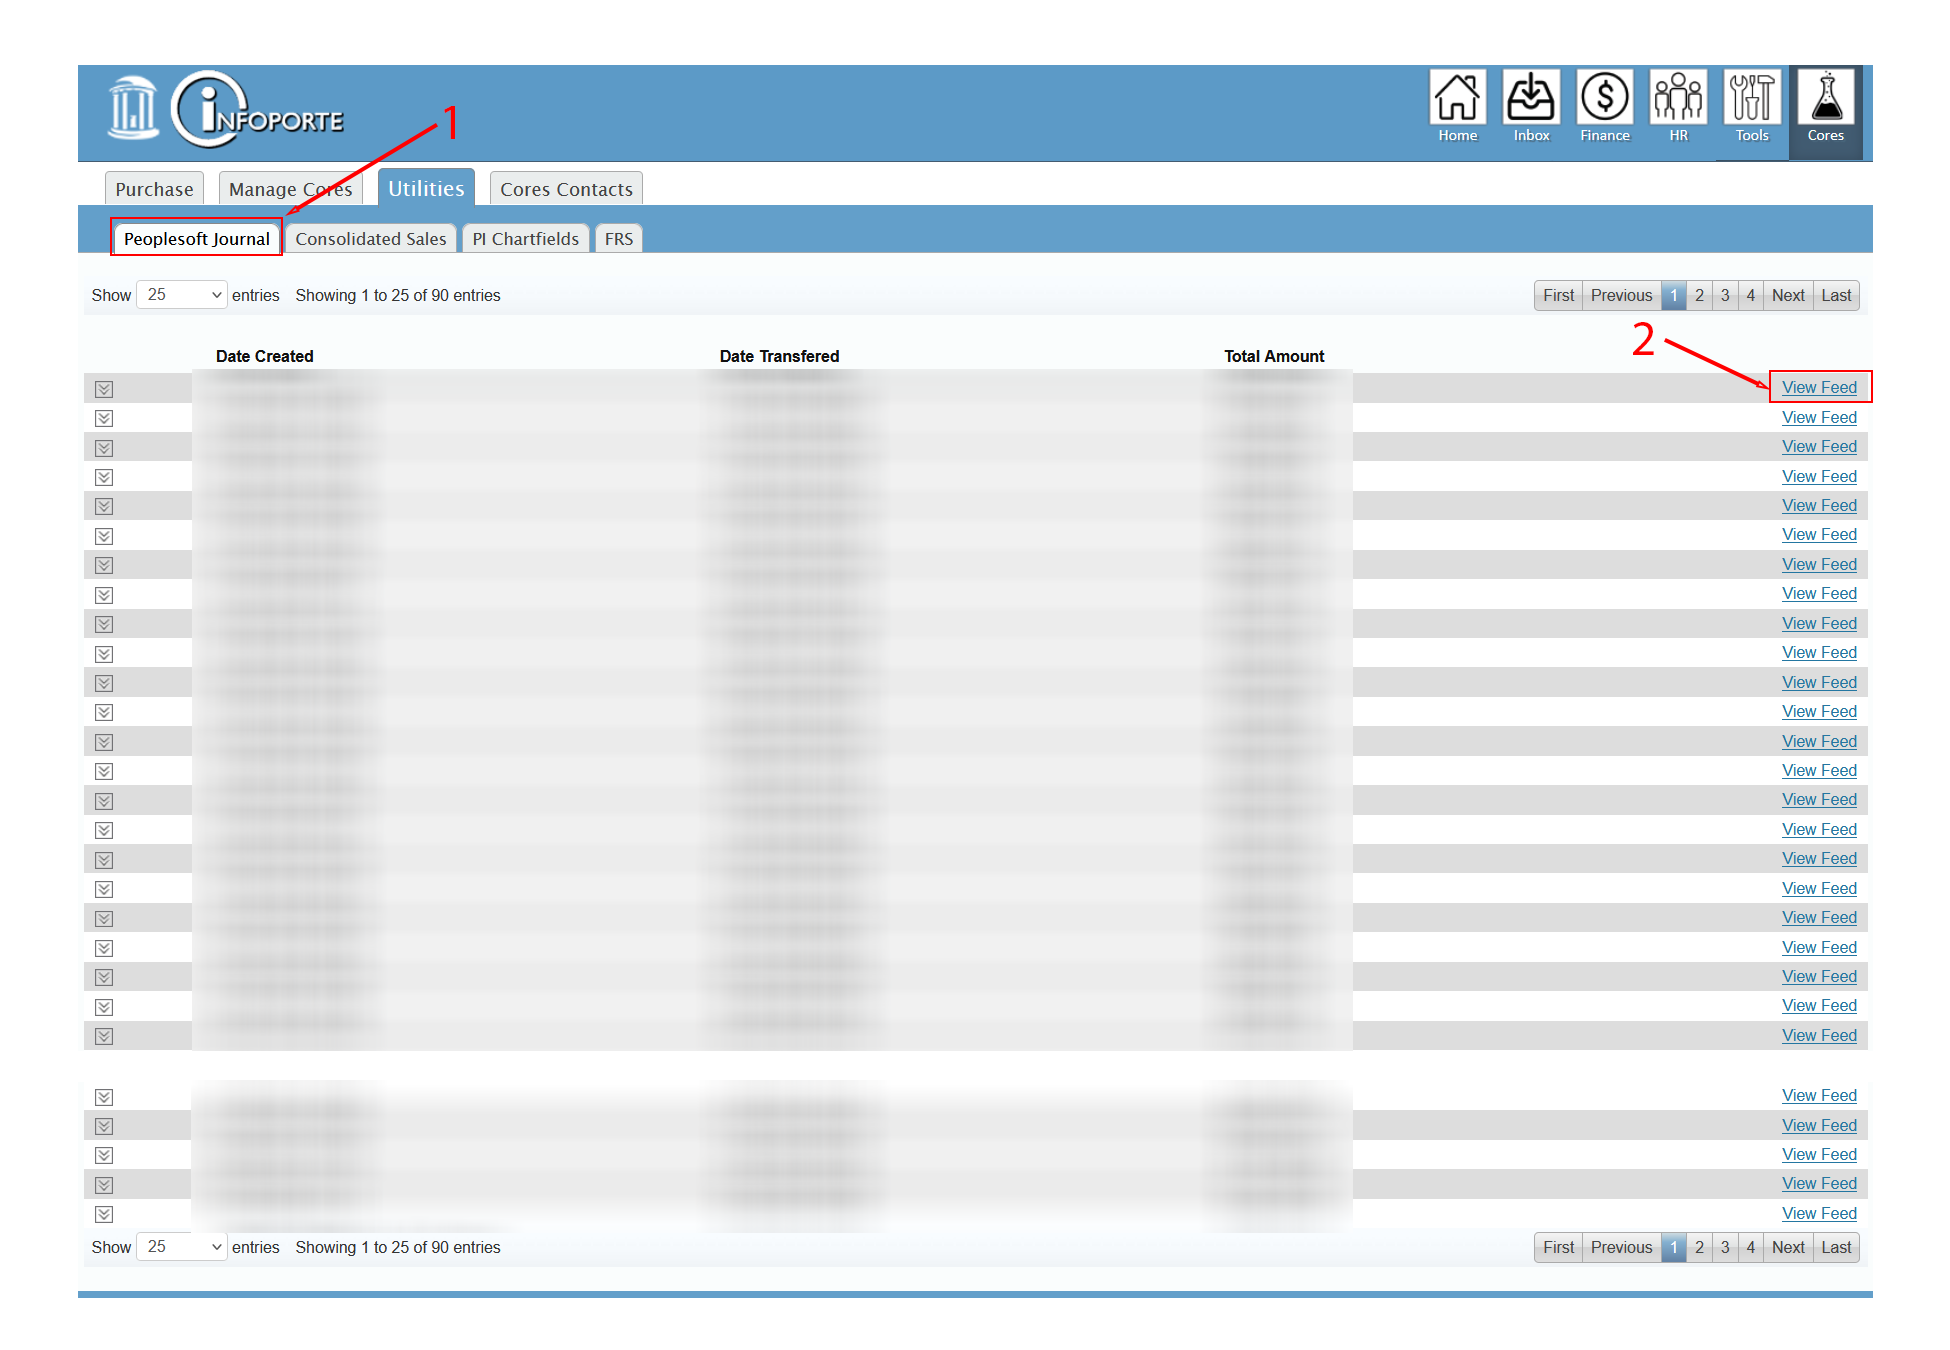
The Peoplesoft Journal page shows each month’s feed date and total. It also allows you to look at detailed data for the month by clicking on the View Feed link (#2 above).
Note that the Feed Data shows pre-edited transactions – if there were Chartfield string errors or Budget problems and an order was put into Suspense (see Billing Processes for Cores above), then the Feed Details showing Chartfield String may not be all correct.
Some Cores find that they have many similar orders to put into Infoporte and want to automate the administration and reduce the time needed to enter their orders. The Core Order Import process provides this capability. A specifically formatted CSV file can be prepared and uploaded into Infoporte Cores that generates multiple orders at once.
Core Import access is granted on an individual basis. You must request and be granted Core Import access to begin this process.
Start the import process by going to the Core Import page (#1 below), under Manage Cores after you select a Core to manage.
 The format of your import file is specific, with some information not needed. Click the Download New Orders Template (#2 above). Accept the downloaded file that has the CSV format for your import file.
Each line of the Import file needs to have the Item# and Component# that are being ordered. These numbers are internal reference numbers to Infoporte Cores and can be found for your Core by clicking the Generate Components Mapping button (#3 above). Accept the downloaded file that shows all of the Item numbers and Component numbers for the core that you are viewing.
The first time that you try to import orders will be the most difficult. There are many and various data validation checks made to each file imported and you are likely to get errors back. We strongly recommend that you use Infoporte’s test system https://tst.infoporte.unc.edu to get your import file correct before trying to import a file into production. Ask the ERDS team for help with importing your orders.
To import a file click on the Browse… button (#4 above) to find your import csv file on your computer.
After your file has been uploaded click the Submit button (#5 above).
To import a different file than the one uploaded, click the Clear button (#6 above).
Be patient while orders are being imported. If you are importing hundreds of orders it may take several minutes before you see the results. If the imported data doesn’t pass validation checks you will see error messages that will help you to make corrections.
When your file is imported you will get a summary of how many orders were imported and the total amount of all the orders that were imported.
Note that orders that are imported still have to be approved one by one – unless the Import Orders to Complete (#6 in the Creating a Core section above) flag is checked on your Manage Cores page.
One of the most frustrating problems with placing Infoporte Cores orders is getting the Chartfield String correct. When a Chartfield string is entered incorrectly it results in the order being placed into suspense. This means that the order was paid for using a department ‘suspense’ fund instead of a specific Chartfield string.
PI Chartfields were added to Cores to help buyers use correct and valid Chartfield strings for the Principal Investigator (PI) that they are purchasing for.
The Cores PI Chartfields process allows both Setting and Using PI Chartfields.
Setting PI Chartfields
To begin setting up PI Chartfields, go to the Cores Utilities Tab. PI Chartfields can be found there (#2 below).
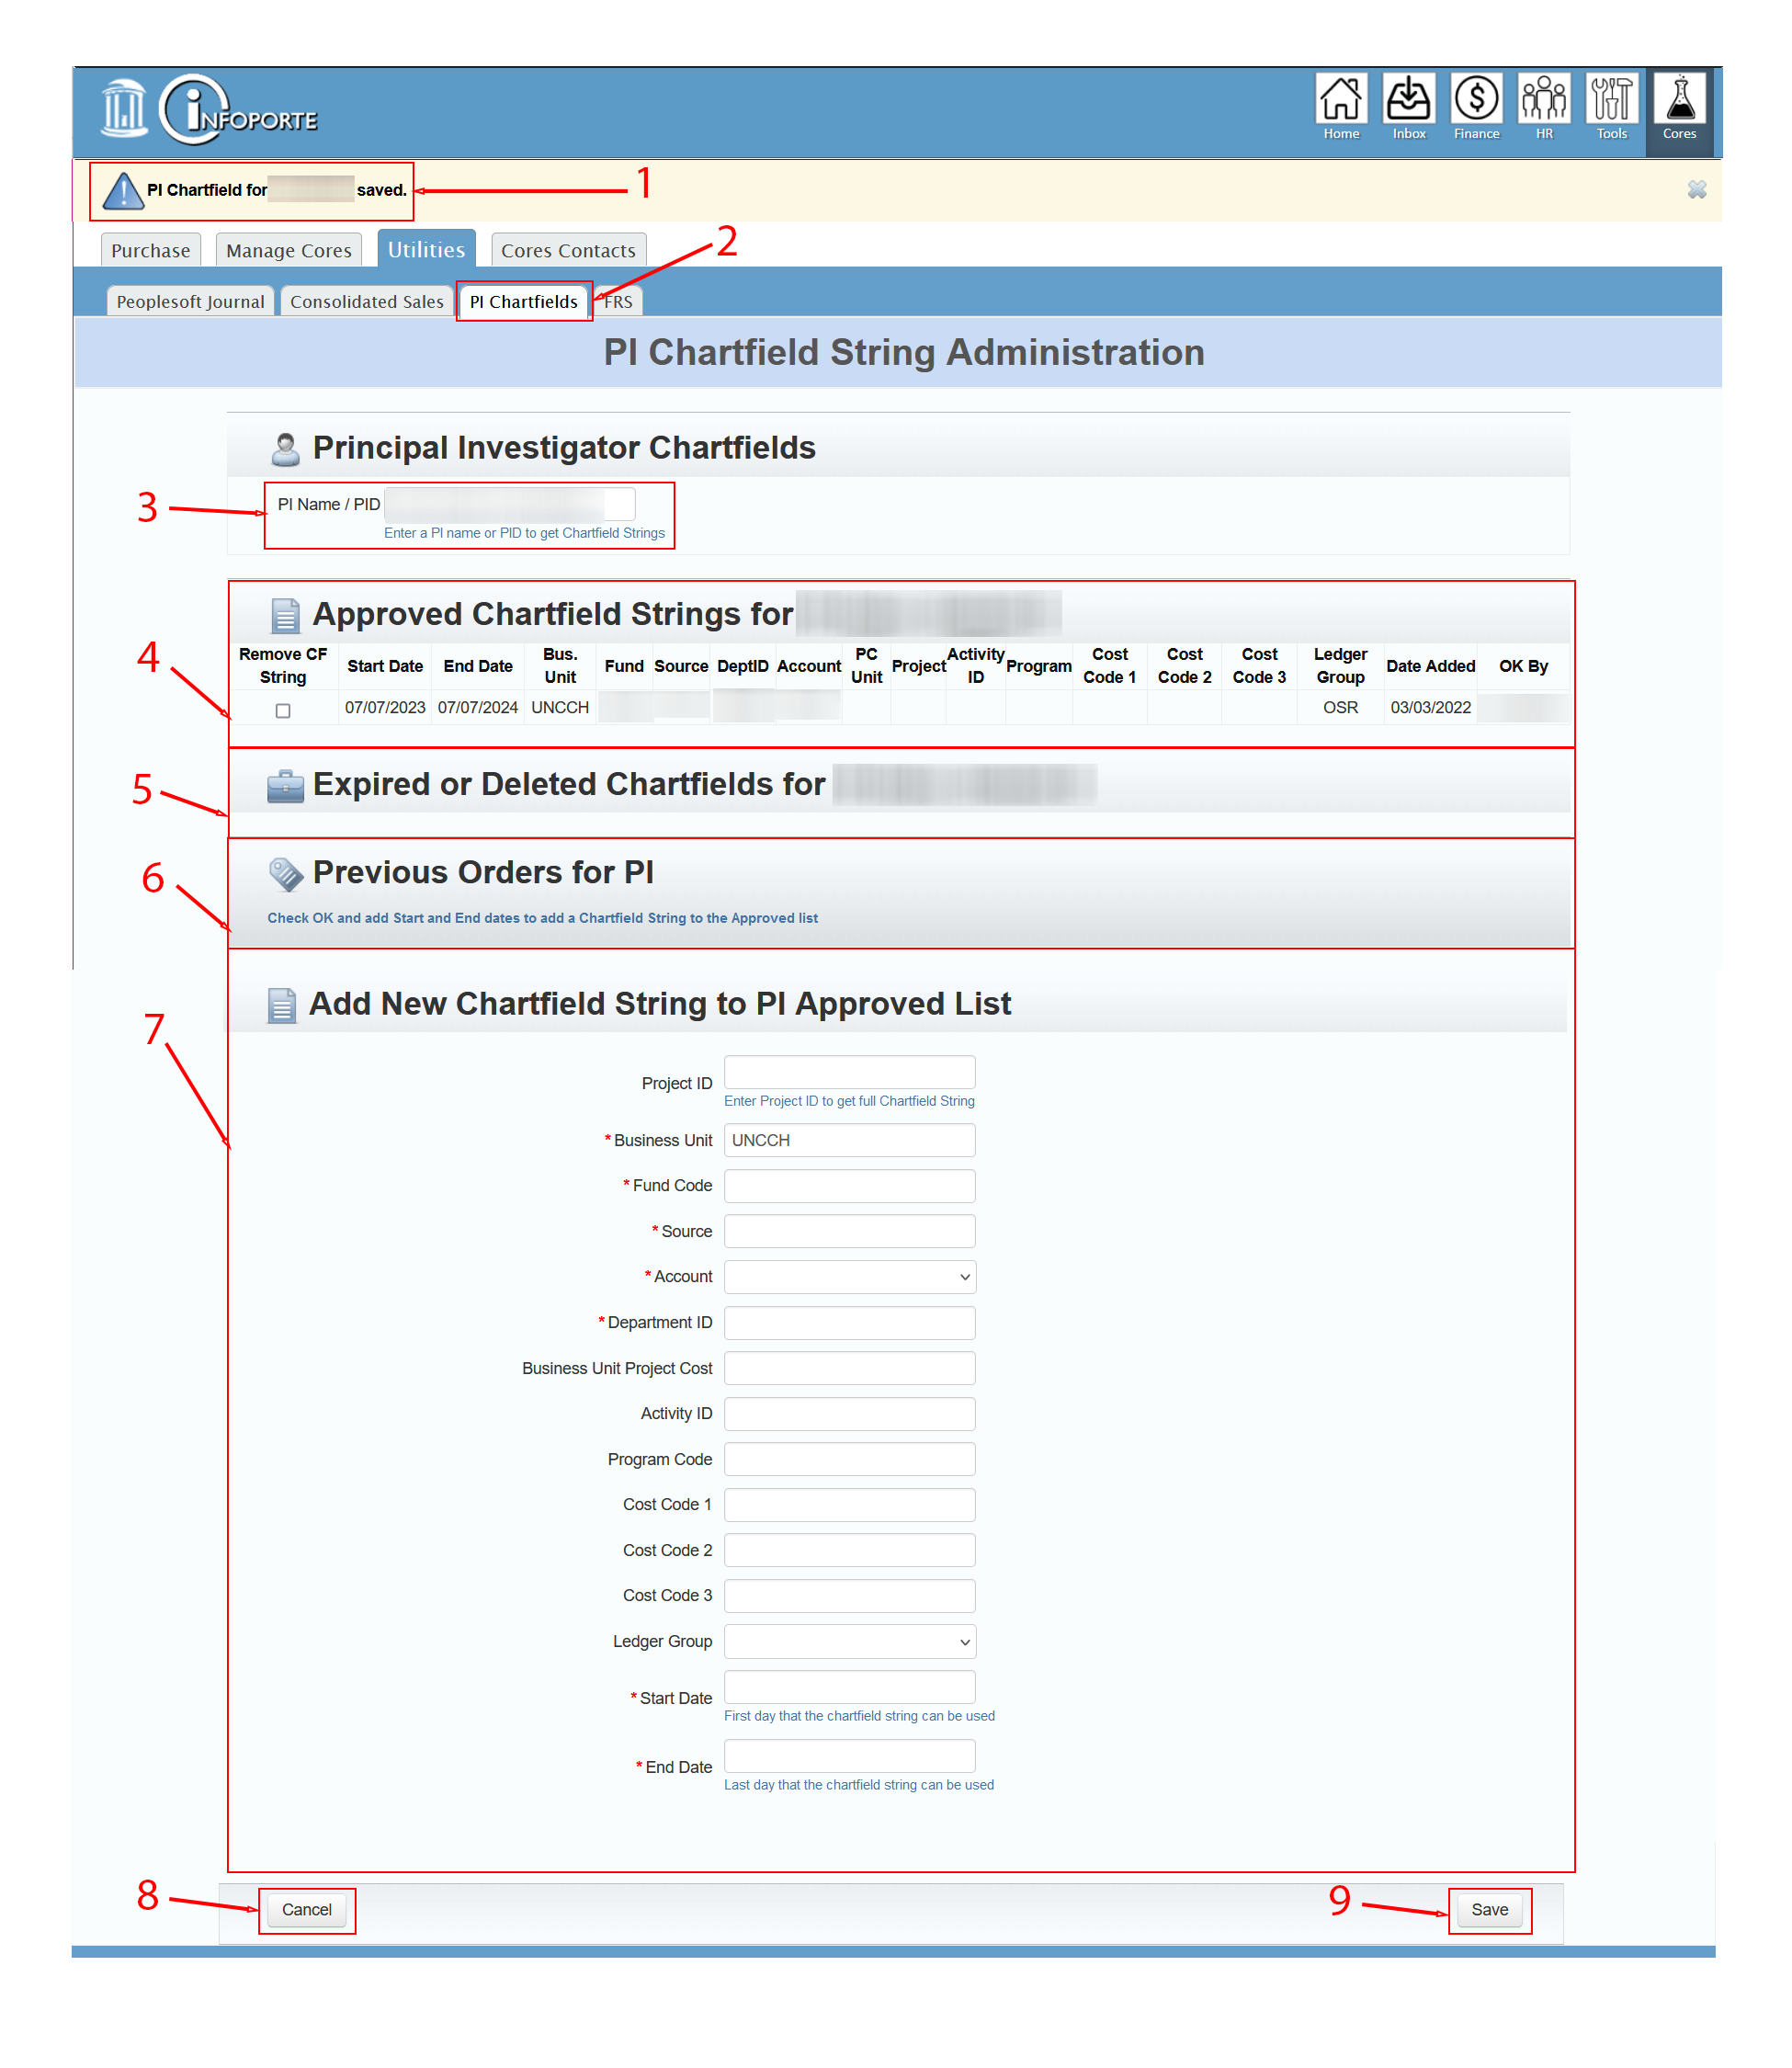 Enter a PI’s name and you will see if any Chartfield Strings have been assigned to that PI (#2 above)
Chartfield Strings that have been approved and active for a PI are listed under Approved Chartfield Strings for PI (#4 above).
Expired or Deleted Chartfields, if any, are shown under the Approved Chartfields for reference (#5 above).
Any orders previously placed are listed under Previous Orders for PI (#6 above). If a Chartfield is listed here and is not Approved, it may be a candidate to add to the Approved Chartfield list.
If you are entering a new Chartfield for a PI, then complete the entire Chartfield String, including beginning and ending dates that the Chartfield String should be used (#7 above), then click the Save button.
If any changes have been made on this page click the Save button (#9 above) to save them for use by others that are placing orders for this PI.
Or if changes have been made that you don’t want to save, click the Cancel button (#8 above).
Using PI Chartfields
The Approved Chartfields appear on the checkout page when it is time to place an order – on the Order Confirmation page.
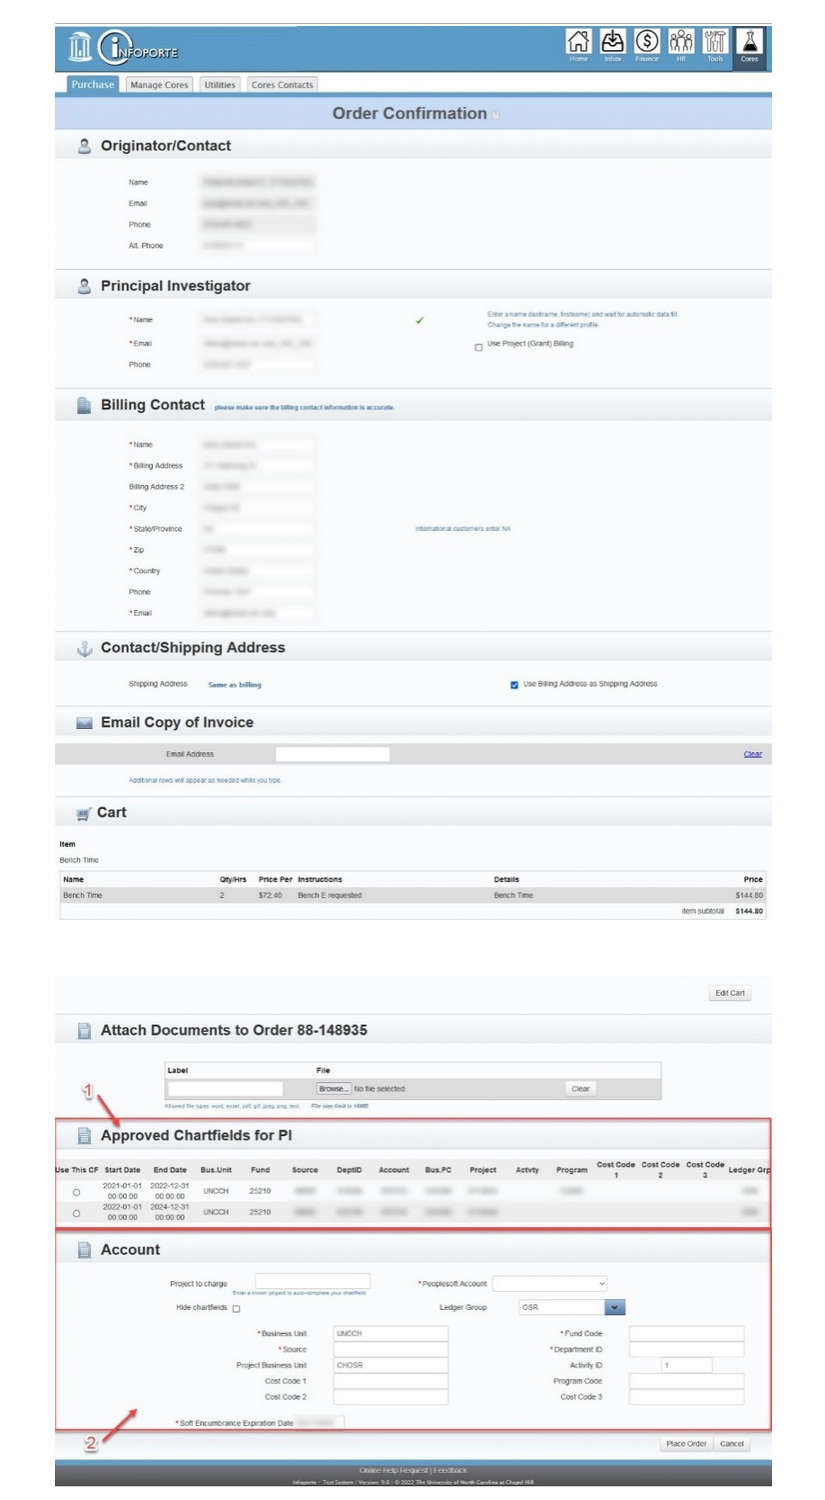
When a PI is entered on the Order Confirmation page that has some Approved Chartfields, a list of the Approved Chartfields (#1 above) shows up above the Account Information (#2 above) on the page.
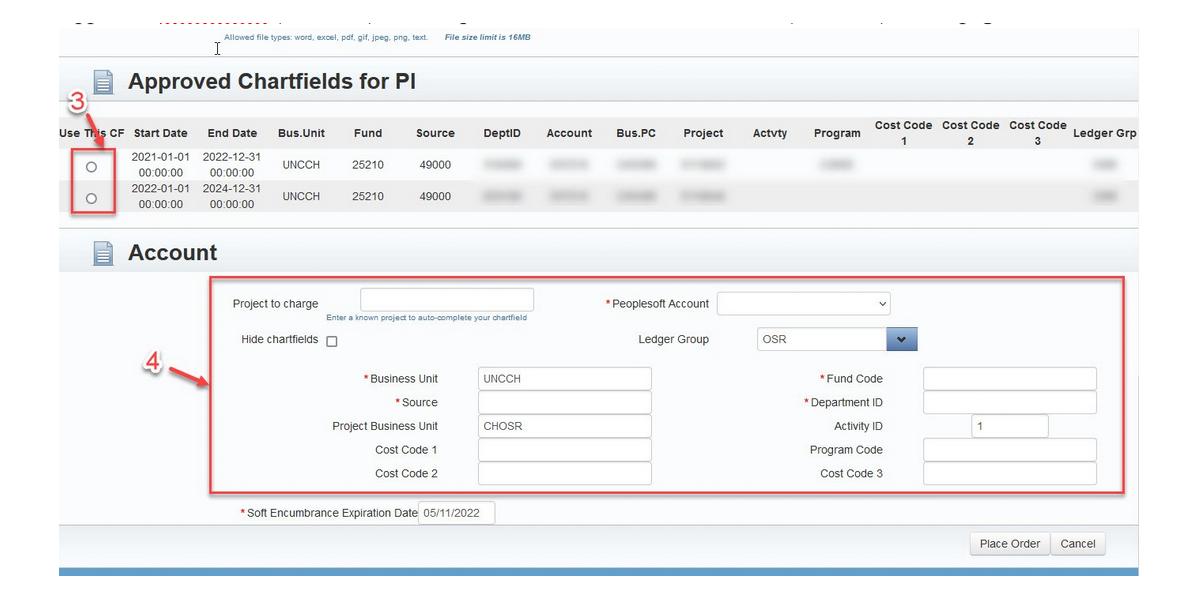
If you see a Chartfield that you would like to use under the Approved Chartfields for PI, simply click on the radio button to the left of that Chartfield (#3 above) and the Chartfield will be filled in as the Account information (#4 above).
Please note the End Date of the Approved Chartfield that you select to use. Make sure that the End Date goes into the next month on the calendar, or it is possible that your transaction will not pass Chartfield validation if funds have run out or if the budget for the Chartfield has expired.